Question:
How can I insert into the database the information from the commands sent via Elipse Power?
Solution:
In this example, four different types of data will be inserted in the database, regarding each sent command:
- Operator logged to the system.
- Command unit (from there on, you can check the object corresponding to the command).
- Command type (Select/Operate/Cancel).
- Timestamp.
To do so, follow these procedures:
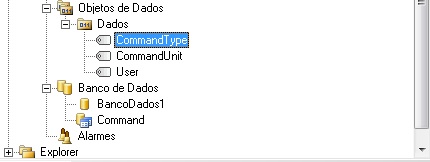
1. Create three internal tags and set them up as Strings. As seen below, the new tags were named CommandType, CommandUnit, and User:
2. Create historic whose ScanTime property (or Save a new record every… option at the historic’s settings) is set up as 0. In this historic, create three String-type fields, and link them to the Value property of the internal tags previously created. For this example, a historic called HistCommand was created, containing CommandUnit, CommandType, and User fields, according to the figure below:
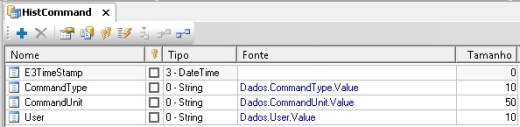
NOTE: when setting up a field as a String, you will need to also set up this field’s size.
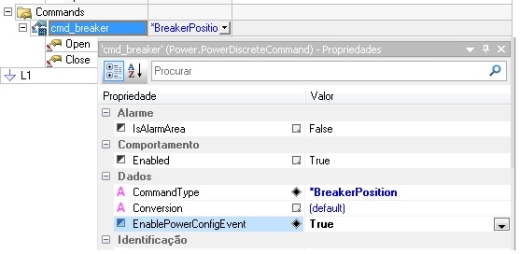
3. After creating the historic and generating the table in the database, you need to set up which commands will be recorded in this DB. In this example, there is only one breaker object, so the data regarding this object’s position command are inserted in the database. Elipse Power’s command objects contain a property called EnablePowerConfigEvent, whose function is to enable/disable the generation of OnCommand events from ConfigurationPower object (see next item). Therefore, in this item, the EnablePowerConfigEvent property of the commands to be recorded must be set up as TRUE, as seen below:
4. Finally, create a script at ConfigurationPower‘s OnCommand event. This event will be fired whenever any command is executed (as long as EnablePowerConfigEvent property is set up as TRUE). This event returns the following parameters: CommandUnit (Command Unit receiving the command), CommandAction (integer that indicates the command type: 1-Operate, 2-Select, 3-Cancel), and ActorID (name of the user sending the command).
The script will be developed in order to attribute the necessary information regarding each command to the internal tags previously created, and after that, to insert a new line in the table.
As seen above, the OnCommand event returns three parameters which must be linked to the internal tags’ values. Notice that CommandUnit parameter returns an object, therefore it must use a property from this object. In this example, the script is as follows:
Case 1
Application.GetObject(“Dados.CommandType”).Value = “Operate”
Case 2
Application.GetObject(“Dados.CommandType”).Value = “Select”
Case 3
Application.GetObject(“Dados.CommandType”).Value = “Cancel”
End Select
Application.GetObject(“Dados.CommandUnit”).Value = CommandUnit.PathName
Application.GetObject(“Dados.User”).Value = ActorId
After linking the parameters returned by the event to the internal tags, insert a new record in the table from the historic’s WriteRecord method as seen below:
By the end, you will have the following script:

Attached to this article is the demo application developed above (user: Elipse / password: Elipse).
Attachments:
