Overview:
When objects are developed at Elipse Power’s Screen Importer, they are proportional in size to the object in the electric model, the model’s drawing area, and the screen. Then, when you create an electric model in an area whose size is not proportional to the operation screen, the objects on the screen may look distorted, and you will need to set them up manually in order to achieve a satisfactory outcome.
To ensure that screen objects will look their best (that is, that they are created with their original sizes), you must create the electric model in an area whose size is proportional to the size available on the operation screen. This article illustrates how you can calculate proportions for this purpose.
Solution:
The demo application in this article displays a frame with three horizontal splitters:
- Upper (Menu_Area)
- Central (SE_Area)
- Lower (Alarms_Area)
The application also displays a screen called SE1_Screen, fitted to the Central splitter’s size (SE-Area) via screen’s Fit Splitter option, which ensure the splitter looks proportional. From there, follow these procedures to create an electric model according to the available size for the screen:
1. Save the values of Height and Width properties of the screen where the model will be imported. Notice these values depend both on screen resolution (Viewer Settings) and on the splitters created on the frame. In this example, the values are:
Height = 14907,948
Width = 36142,083
NOTE: Each application’s properties have different values, according to its splitter and Viewer resolution.
2. Check the size of the objects being created in the electric model at their Size property, which by default is set up proportionally to the electric model’s drawing area. In this example, the objects have been developed with Size = 20.
3. With this data (operation screen’s height and width and electric model’s objects’ size), you can measure the area available for creating the electric model. To do so, use this formula:
XMax = (Width / 2000) * Size
YMax = (Height / 2000) * Size
Where:
XMax: Electric model’s drawing area’s width
YMax: Electric model’s drawing area’s height
Width: Operation screen’s width
Height: Operation screen’s height
Size: Object’s size in the electric modeler
4. When you apply the demo application’s values to the formula, you’ll have:
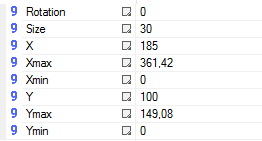
XMax = (36142, 083/ 2000) * 20 = 361,420
YMax = (14907, 948/ 2000) * 20 = 149,080
5. The values obtained from the calculation above must be applied to the electric model’s drawing area’s XMax and YMax properties (when clicking the drawing area, these properties are available on Studio’s lower left side). In this example, the area of the model being sized is from SE1 substation, where XMax and YMax properties were configured like this:
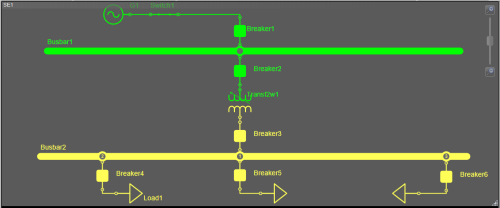
6. After setting up your drawing area’s size, create the electric model in the available space. Notice that the distance between objects in the electric model is smaller than the area being represented on the screen, so that the terminals are close enough in the electric model. The figure below illustrates the model created in this example:
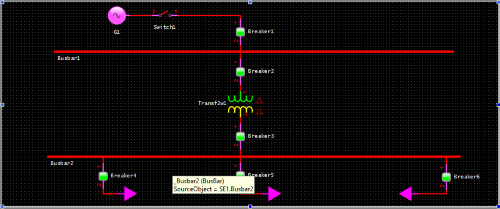
7. Finally, import the electric model to the operation screen by right-clicking it and selecting the option Import Electric Model. Run the application and check if sizes on the screen are proportional to the available size. The figure below illustrates the model imported to the operation screen:
NOTES:
1. In case the electric model had been previously created and you didn’t calculate for proportions, there are two possibilities for improving the operation screen’s layout:
- Use Screen Zoom: These options (100%, Fill, Width, etc.) can give you a satisfactory result, since the whole model can be shrunk or enlarged according to screen zoom; however, screen objects tend to look distorted.
- Apply the proportions formula used in this article, but using the Size value of the electric model’s objects: That way, these objects will be resized according to the sizes of the operation screen and of the drawing area of the electric model. You will need to edit the Size property of each object in the model manually.
2. Attached to this article is the demo application discussed above.
Attachments:
