1) Introduction
Formulas are modules designed to store and transfer value sets to certain variable groups, in order to create pre-defined settings. E3’s Formulas module provides you will all the tools needed to create these value sets (Formulas) and link them to a Template. Templates are the formatted tables in a Database, and they inform the number of variables comprising a formula, the data type that can be stored in each variable, and the types of permissions and restrictions. Formulas that were created for a certain Template can be sent to/loaded into either a Template or a variable group, as long as the 1:1 ratio of the elements in the template is obeyed.
The variable groups are also called Units, and different units can be assigned to the same template. Thus, when you send the formula values to a set of tags, the Formula will be the origin of the data and the Units will be the data destination. But when you save the current tag values in a formula, the tags are the data origin and the Formula is the destination. The Template will only define the amount of data in these operations, as well as their type and restrictions.
To use this resource, right-click the project and select the item Formula.
Using Formulas in Elipse E3: Examples
Formulas can be used in some application cases. For example:
- When the client needs to store values and then load them into tags at a specific time.
- When the client needs retentive tags, i.e., tags that maintain the last applied values when the domain is closed.
To show you how to use Formulas in E3, we will create a project that reproduces the first application example. This project simulates loading values that will be used for manufacturing candy by three machines. Initially, there will be five types of candy.
2) Creating the project
First, create a default project called TrainingFormulas inside C:\TrainingFormulas, and select the Save data on disk option. The database should be called Formulas.mdb. Then, rename the screen to Formulas, and select the Viewer to open this screen.
Creating data and the formula
In the data server, create the three following folders: Machine1, Machine2, and Machine3. Inside each of these folders, create four internal tags: Sugar, Water, Glucose, and Syrup.
Then, insert a formula in your project with a table called Candy, and select the DBServer database. All the data from this formula, such as format and values, will be stored in this table.
On the desktop, insert four new templates called Sugar, Water, Glucose, and Syrup. To demonstrate how to use restrictions, the first two items will be set with absolute limits, and the forth one will be set with a restricted limit. These values will be set as seen in figure 1. Each restriction is explained in its respective setup window, which can be accessed through the ellipsis button located on the right side of the edit restriction area. These restrictions prevent invalid values from being input to the tags, as they may cause problems in the process, such as wastage, defective products, etc.
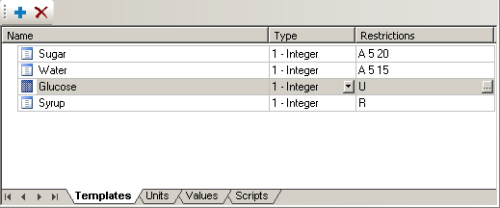
Figure 1: Creating restrictions
Having done that, select Units tab and create three items: Machine1, Machine2, and Machine3. Then, refer each item to their respective tags, as seen in figure 2. These links will also be saved in the database table along with the formula data.

Figure 2: Linking tags
To finish setting up the formula, create five value sets and set them up as shown in figure 3. These are the initial products and values that we will use. They can be changed later.
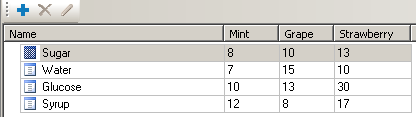
Figure 3: Setting up values
Setting up the screen to manipulate the formula
To manipulate the formula, create a screen as shown in the figure 4.
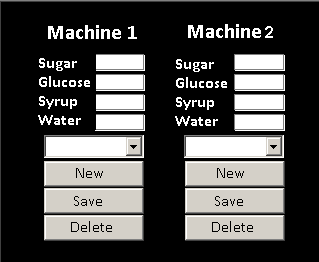
Figure 4: Formula manipulation screen
All texts on the screen are Labels. Next to each “Candy” text, a Display should be placed to show which candy is selected. White rectangles are SetPoints for manipulating tags values. Ideally, objects will be created in one of the machines and then copied to the other two, changing only the machine name.
After creating the screen, create an internal tag inside each data server folder (Machine1, Machine2, and Machine3) called CurrentCandy. Refer each Display next to the “Candy” texts to its respective tag. Refer the SetPoints to their respective tags. Remember that all tags are in data folders referring to the machines.
In order to load the items to the ComboBox, a Query item should be inserted onto screen and set up to produce the Candy_Values table, selecting only its Name field. Then, set up the following script in the ComboBox’s OnStartRunning event:
Set RS = Screen.Item(“Query1”).GetADORecordset()
For aux = 1 To RS.RecordCount
AddItem CStr(RS.Fields(“Name”))
RS.MoveNext
Next
End Sub
After this, we need to create a procedure to load the values of the selected item in the ComboBox into the tags. To do so, we should create a new event in the ComboBox that will be called whenever the index is changed, i.e., when the selected item is changed.
To create a new event, select the Other Events option in the ComboBox script area. To add a new event, just click the addition (+) button. The event should be created as shown in the figure below.
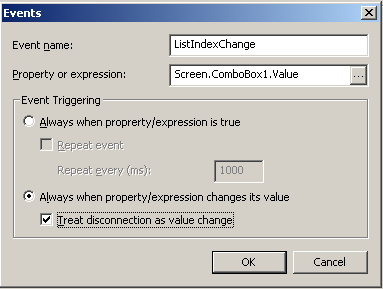
Figure 5: Creating the event
In the event created in the ComboBox, add the following script:
If Value <> “” Then
Set RS = Screen.Item(“Query1”).GetADORecordset()
For aux = 1 To RS.RecordCount
If Value = RS.Fields.Item(“Name”) then
Application.GetObject(“Formula1”)_
.LoadFormulaValuesQuiet “Machine1”, Value
Application.GetObject(“Data.Machine1.CurrentCandy”).Value = Value
Exit Sub
End If
RS.MoveNext
Next
End If
End Sub
When this script is done, the ComboBox is finished. Then make scripts for the other two ComboBoxes following this pattern. Now we need to setup the buttons for handling the values and the candy.
For the Create New button, the script should scan the Database’s RecordSets to ensure that the name of the candy to be created doesn’t already exist through an auxiliary variable named equal. If it does, it won’t allow the same name to be created again. If it does not exist, the name will be added normally. To do so, follow the script below:
equal = 0
Set RS = Screen.Item(“Query1”).GetADORecordset()
For aux = 1 To RS.RecordCount
If Screen.Item(“ComboBox1”).Value = RS.Fields(“Name”) Then
equal = 1
End If
RS.MoveNext
Next
If equal = 0 And Screen.Item(“ComboBox1”).Value <> “” Then
Application.GetObject(“Formula1”).CreateValue &_
_&Application.GetObject(“Data.Machine1.CurrentCandy”).Value)
Set RS = Screen.Item(“Query1”).GetADORecordset()
RS.MoveLast
Screen.Item(“ComboBox1”).AddItem RS.Fields(“Name”)
Screen.Item(“ComboBox2”).AddItem RS.Fields(“Name”)
Screen.Item(“ComboBox3”).AddItem RS.Fields(“Name”)
Application.GetObject(“Data.Machine1.Sugar”).Value = 0
Application.GetObject(“Data.Machine1.Glucose”).Value = 0
Application.GetObject(“Data.Machine1.Syrup”).Value = 0
Application.GetObject(“Data.Machine1.Water”).Value = 0
End If
Application.Deactivate()
Application.Activate()
End Sub
The script works as a template for creating scripts for the two remaining buttons. To create a new type of candy, type its name in the ComboBox and click Create New button. Then, set up the values for the candy ingredients. This can be done via the following script in Save button, as shown below.
If Application.GetObject(“Data.Machine1.Water”).Value >= 5 and &_
_&Application.GetObject(“Data.Machine1.Water”).Value <= 15 then
Application.GetObject(“Formula1”).SetValueData &_
_&Application.GetObject(“Data.Machine1.CurrentCandy”).Value, “Water”, &_
_&Application.GetObject(“Data.Machine1.Water”).Value
Else
MsgBox(“The value you’ve typed for water is invalid, _
because there are restrictions for this item! “)
End If
If Application.GetObject(“Data.Machine1.Sugar”).Value >= 5 and &_
_&Application.GetObject(“Data.Machine1.Sugar”).Value <= 20 then
Application.GetObject(“Formula1”).SetValueData &_
_&Application.GetObject(“Data.Machine1.CurrentCandy”).Value, “Sugar”, &_
_&Application.GetObject(“Data.Machine1.Sugar”).Value
Else
MsgBox(“The value you’ve typed for sugar is invalid, _
because there are restrictions for this item!”)
End If
Application.GetObject(“Formula1”).SetValueData &_
_&Application.GetObject(“Data.Machine1.CurrentCandy”).Value, “Glucose”, &_
_&Application.GetObject(“Data.Machine1.Glucose”).Value
Application.GetObject(“Formula1”).SetValueData &_
_&Application.GetObject(“Data.Machine1.CurrentCandy”).Value, “Syrup”, &_
_&Application.GetObject(“Data.Maquina1.Syrup”).Value
If Screen.Item(“ComboBox2”).Value = &_
_&Application.GetObject(“Data.Machine1.CurrentCandy”).Value then
Application.GetObject(“Formula1”).LoadFormulaValuesQuiet “Machine2”, &_
_&Screen.Item(“ComboBox2”).Value
End If
If Screen.Item(“ComboBox3”).Value = &_
_&Application.GetObject(“Data.Machine1.CurrentCandy”).Value then
Application.GetObject(“Formula1”).LoadFormulaValuesQuiet “Machine3”, &_
_&Screen.Item(“ComboBox3”).Value
End If
End Sub
This script also ensures that the values adjusted to the items are within the selected limit range, and shows an error message when they are not.
Now it is time to create and change values for the types of candy. We will still need to set the application up to allow excluding the selected candy. For this, we will set up a script for the Delete Selection button. This script will require protections and a few other procedures so as not have the candy accidentally deleted from all the selected locations. This script will look like this:
index = Screen.Item(“ComboBox1”).ListIndex
Application.GetObject(“Formula1”)_
.DeleteValue Screen.Item(“ComboBox1”).Value
if Screen.Item(“ComboBox2”).Value = Screen.Item(“ComboBox1”).Value then
Screen.Item(“ComboBox2”).Enabled = false
Screen.Item(“ComboBox2”).Value = “”
Screen.Item(“ComboBox2”).Enabled = true
Application.GetObject(“Data.Machine2.Sugar”).Value = 0
Application.GetObject(“Data.Machine2.Glucose”).Value = 0
Application.GetObject(“Data.Machine2.Syrup”).Value = 0
Application.GetObject(“Data.Machine2.Water”).Value = 0
end if
if Screen.Item(“ComboBox3”).Value = Screen.Item(“ComboBox1”).Value then
Screen.Item(“ComboBox3”).Enabled = false
Screen.Item(“ComboBox3”).Value = “”
Screen.Item(“ComboBox3”).Enabled = true
Application.GetObject(“Data.Machine3.Sugar”).Value = 0
Application.GetObject(“Data.Machine3.Glucose”).Value = 0
Application.GetObject(“Data.Machine3.Syrup”).Value = 0
Application.GetObject(“Data.Machine3.Water”).Value = 0
end if
Screen.Item(“ComboBox1”).RemoveItem(index)
Screen.Item(“ComboBox1”).Enabled = false
Screen.Item(“ComboBox1”).Value = “”
Screen.Item(“ComboBox1”).Enabled = true
Application.GetObject(“Data.Machine1.Sugar”).Value = 0
Application.GetObject(“Data.Machine1.Glucose”).Value = 0
Application.GetObject(“Data.Machine1.Syrup”).Value = 0
Application.GetObject(“Data.Machine1.Water”).Value = 0
Screen.Item(“ComboBox2”).RemoveItem(index)
Screen.Item(“ComboBox3”).RemoveItem(index)
End Sub
Notice that the script scans and deletes the selected item from the database table, and then sets all these values as 0 to then remove the selected item from all ComboBoxes. This script works as a template for the two remaining removing buttons.
Now we can execute the domain and perform the running tests for all resources in the application.
3) Final Remarks
This application was not meant to show the best way to configure the application, but rather a way of using formulas with the highest possible number of features without having to use the pre-set tools in the formulas module. We also tried to show how to update the data in the formula by using another very useful E3 tool – the E3Query – which is used to search for data in the database tables.
For any questions or problems related to formulas or specifically to this application, please refer to Elipse Software’s technical support.
