Introduction
The use of relational databases involves installing and administering them. However, it is not always possible to have these features available at the time of testing or implementing a certain project. Thus, this article discusses some points on the basic installing and the set of actions to be taken for Elipse E3 to save and consult data in a MS SQL Server.
It is important to emphasize that the services of a database manager will be useful from the moment of installing to operating the project, and occasional server settings must be done by a specialized professional.
The instructions presented in this article show the advantages to use a database more reliable than a simple MS Access file.
Local Installation
Requirements
To illustrate how to use MS SQL Server as database for projects involving Elipse E3, we used an evaluation copy of the software, version SQL Server 2000. However, procedures here described are identical to any authorized copy of this software. For a full, definitive installation of MS SQL Server 2000, hardware and software requirements must be confirmed with Microsoft, as well as any authorization policies for this product.
The requirements for installing Elipse E3 are not modified when communicating with this database. In case of doubt, check relevant documentation, or contact Elipse Software’s technical support.
Procedures
The following Figures illustrate the standard procedure for installing MS SQL Server 2000 to run in a stand-alone machine, that is, the database server, as well as all clients, which will run in the same computer.
Even if the final application uses remote access to this database server, the first step to creating the system is installing MS SQL Server 2000 in a machine responsible for storage.
Following the instructions bellow is enough to the set the basic configuration for a SQL Server system. Any difficulty should be analyzed, and the solution, looked for in the software technical support provided by Microsoft.
Figure 1 shows the Installation Wizard, which will show all necessary procedures for installing SQL Server. To start, click on the option Install Database Server.

Figure 1: Install Wizard
After selecting the option to install the Server, the new instance creation window appears. In a basic installation, make the option shown in the Figure bellow. For other options, the procedure was not tested. Figure 2 shows the screen that represents the second step in the installation process.
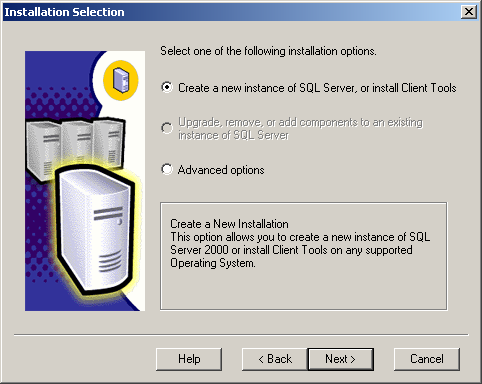
Figure 2: Creating a new instance
After creating the instance, it is time to define where the installation will be located. As stated previously, installation must be done in the local machine. Check the identification on the network machine, for this information will be important when configuring the object Database Server on E3.
In the present case, SQL Server was installed in a machine called “PH”, as shown on Figure 3.
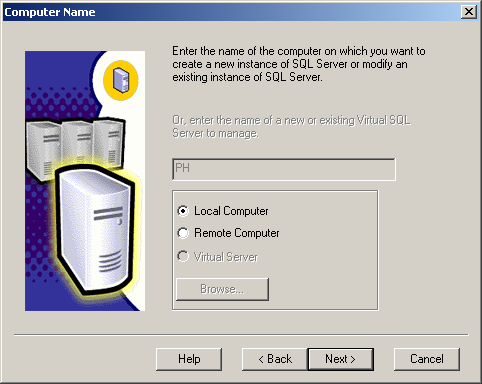
Figure 3: Defining the machine where the installation will be made
The next step, illustrated on Figure 4, will be defining the instance name for SQL Server. In the present case, no modification on these parameters will be made so click Next to go to the next step.
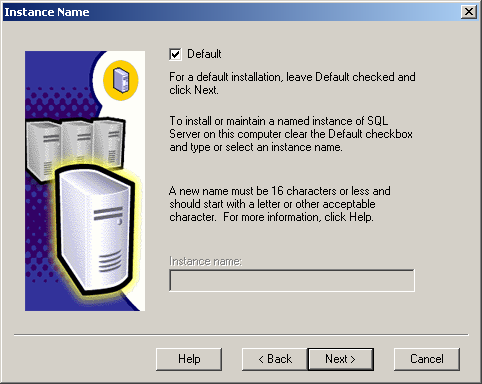
Figure 4: Defining the Instance Name
Once more, standard options will be used to define Services Accounts parameters. The screen shown in Figure 5 corresponds to the setting of these options.
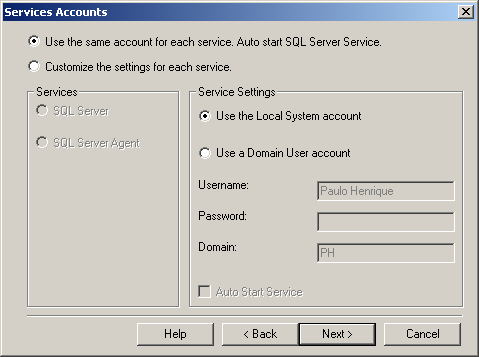
Figure 5: Service Accounts
The next step is the definition of the authentication mode to be used in the SQL Server which can follow the configuration defined by Windows or use a mixed model (which combines authentication through Windows or through SQL Server). To communicate with E3, it is necessary to use the mixed model. In order to do that define the administrator password (user “sa”). In the example used to demonstrate these procedures the password used was “sa”, identical to the user “sa”. Check the correct orthography for the words to avoid errors.
An alternative configuration to the authentication supported by SQL Server through the SQL Server Enterprise Manager tool will be shown afterwards. This toll is more described with more details in a posterior part of this document.
Creating Databases in the server
SQL Server structure
Interaction with database server is done through the SQL Server Enterprise Manager tool. After the server is installed, when running for the first time the Enterprise Manager tool, the structure found will be like the one shown in Figure 6. The different system features used by the server are presented there, including different databases internally created for operating and maintaining the system.
To avoid server running problems, modifications in these databases will not be presented here. It is advised that whenever a new project is started on a SQL Server, a database is created for this project. This enhances the server performance, as well as isolates different projects, turning the system structure into modular, as is recommended to all E3 projects.
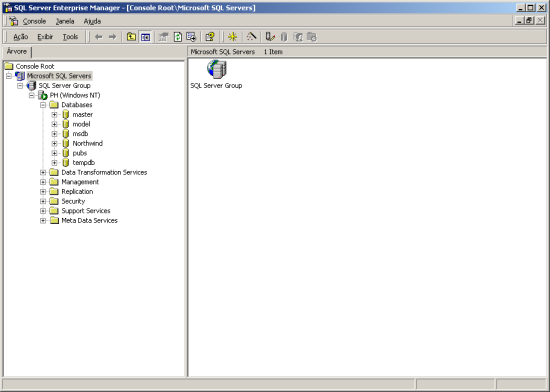
Figure 6: Initial SQL Server structure
The use of SQL Server for data storage demands the insertion of different Database objects in the server. This way, it is possible to separate different systems that are using the same server. For example, each “Database” has its own user control and space configurations available (as set in the Data Files tab of the Database properties, as shown in Figure 9, further ahead). To solve other questions, contact technical support at Microsoft.
Procedures for creating databases on SQL server
To illustrate the connection between Elipse E3 and SQL Server, a Database called TesteE3 will be created. Required settings are shown in Figures 7 to 10.
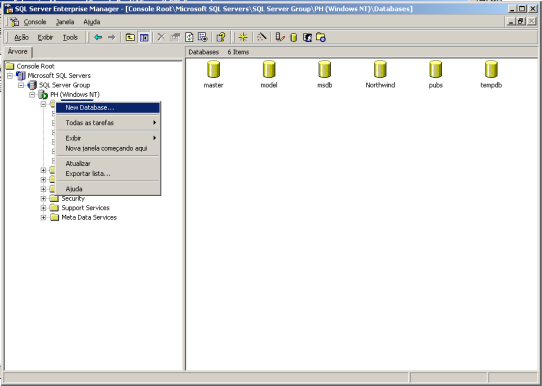
Figure 7: Inserting a new database
The configuration of a new Database in the SQL Server requires some parameterizations, in addition to the name of the object to be created.
As in Access, MS SQL Server databases stores data in separate files, that is, each database is an independent file. The configuration of allocated space for each database is set in the object’s own definition. Another characteristic is that the generation of transaction logs can be implemented by database. Eventually, the information contained in the transaction log file can help in the solution of conflicts between the expected running of E3 and the real behavior. This way, combined with the logs created by E3, a good amount of information regarding solution for possible problems. The configuration of these files is shown on Figures 9 and 10.
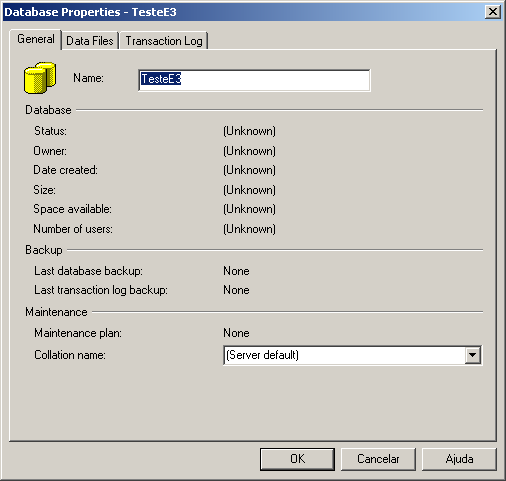
Figure 8: Configuration of Database – General tab
For further details on each step to create a database, check the documentation regarding MS SQL Server 2000, which is installed with the server. There is also a wide choice of literature on the subject.
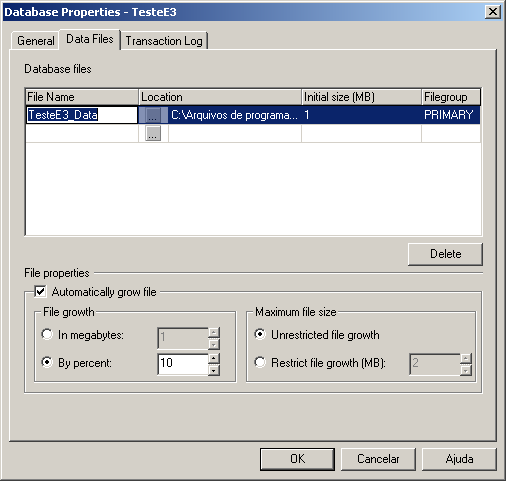
Figure 9: Configuration of Database – Data Files tab
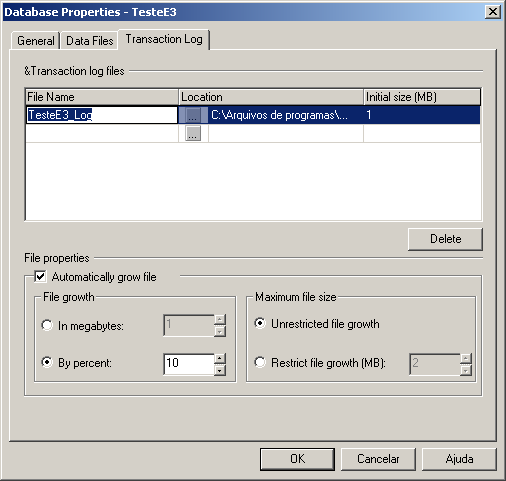
Figure 10: Configuration of Database – Transaction Log tab
Creating Users
User control on SQL Server is done via Login. This login is what receives information on access permission and is with it that one can access a database from an E3 project. In this example, a login “Usuario” will be created, with the password “E3”. This information, along with the database name (“TesteE3”) and the server name (“PH”) is enough for E3 to access SQL Server 2000.
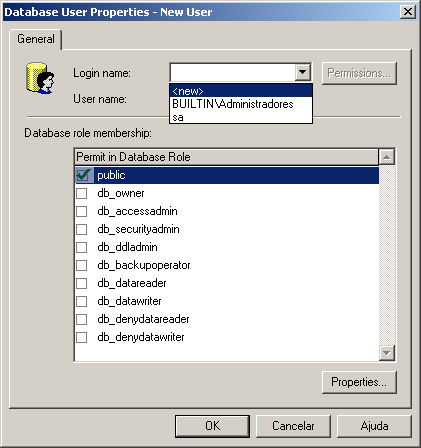
Figure 11: Creating a new Login
Permissions for each role available in the database are inherent to the Server permission model. For further information, check the database documentation.
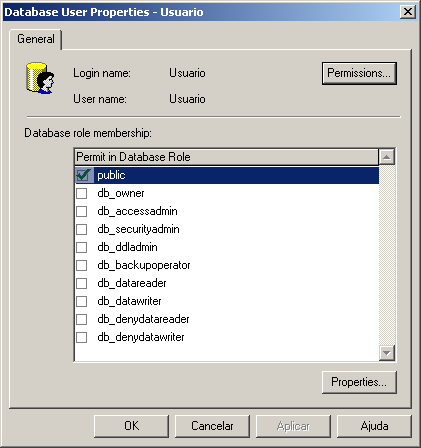
Figure 12: Properties of the created login
On E3, the user must have no restriction, since the structure of database access objects (with History and formulas) must create and/or update table structures.
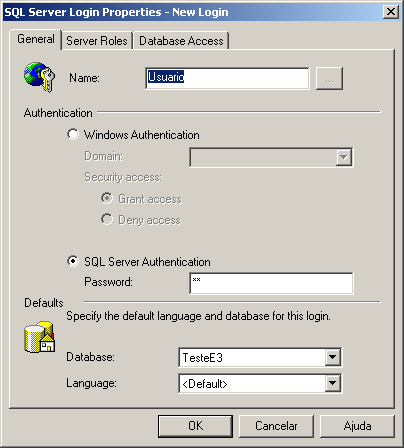
Figure 13: Login properties – General tab
A good security policy is to allow the access of the E3 user only to the database to be worked by E3.
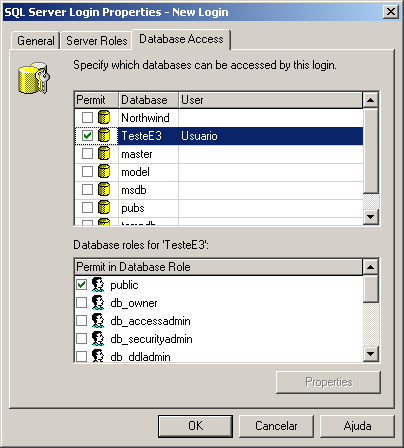
Figure 14: Login properties – Database Access tab
User permission
On SQL Server 2000, permissions for certain users are made via Database. This way, for E3 to interact with the Server, the user previously created must receive all possible permissions because of the way objects that use database on Elipse E3 work.
Access to user settings is done in the Database properties, on the Permissions tab, as seen on Figure 15.
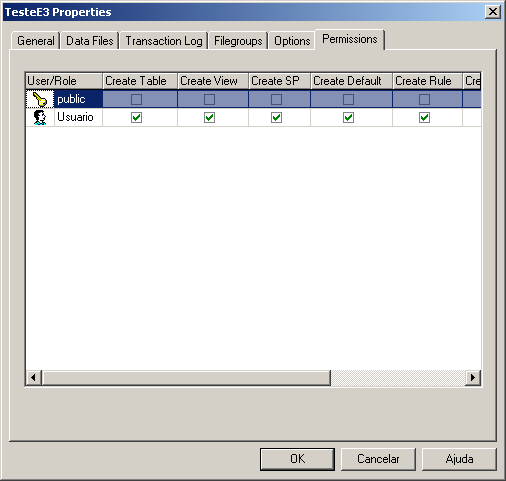
Figure 15: User permissions on Databases
Structure of a user database
A user-created database, as will always be the case of objects defined for use with E3, always has an initial structure as the one shown in Figure 16. All objects related to a “Database” are supported by the SQL standard. The correct use of each object available, aiming a better performance for the E3-SQL Server set, is highly recommended.
However, defining and implementing the necessary types (such as Views and Stored Procedures) is complex, involving planning and time for development, and is fit for an expert. This way, no inclusion of this kind will be shown in this document.
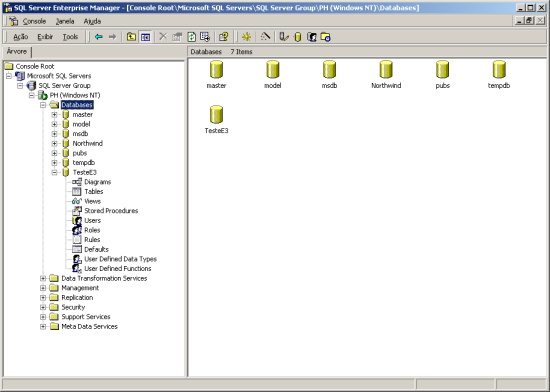
Figure 16: User Database structure
Creating Access to Database on E3
Project configuration
Create a standard application on E3 Studio. This can be done via the Project Creation Wizard. When the wizard is finished, the project will have a similar structure to the one shown on Figure 17.
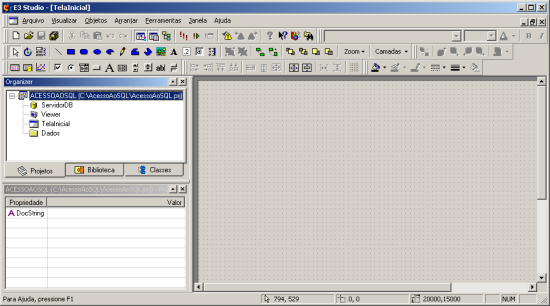
Figure 17: Standard application on E3
To illustrate the access to SQL Server 2000, a historic will be created, registering data by a one second scan. A demo tag must be introduced, with no need to alter its configuration. The configuration of the database server in the standard Project to be used must be done as shown on Figure 18.
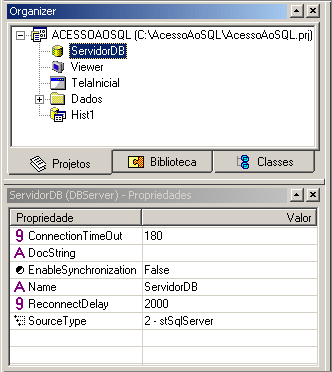
Figure 18: Configuration for DBServer for SQL Server access – Step 1
With a double click on the mouse, go to the SQL Server access configuration window, as defined in the properties window (Figure 18). The parameters must be altered to fit the ones available for installing the SQL Server. If all the steps here presented are followed, the only necessary modification will be the name of the server (“PH”). The other parameters should be the same as shown on Figure 19.
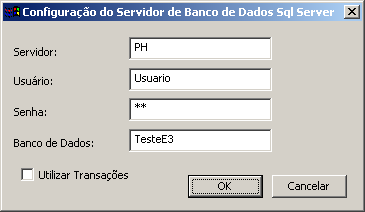
Figure 19: Configuration for DBServer for SQL Server access – Step 2
After setting the database, the configuration of the historic which will access this database must be done. The first step (Figure 20) is the insertion of a demo tag that will be used to send different values to the database.
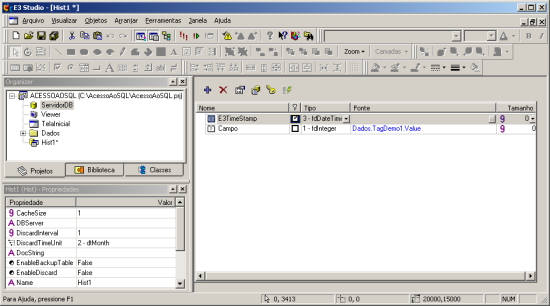
Figure 20: Setting the Historic – Step 1
The next step for the construction of the Historic is setting the database that will be used and also the name for the table that will be created. On Figure 21, it is shown that the name created for the table was TabelaSQLServer. This table will act as illustration for the data search on Elipse E3 and also to visualize the use of SQL Query Analyzer, which is the client used for consulting on SQL Server.
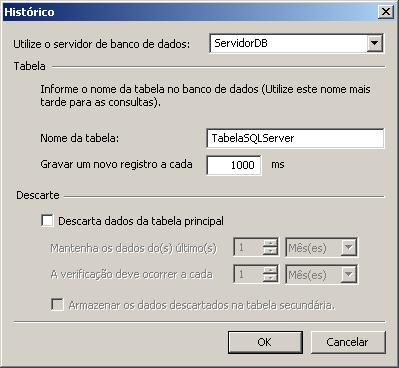
Figure 21: Setting the Historic – Step 2
After finalizing the configuration of Historic, the final step is to create the table structure on the DBServer. To do that, use the Generate structure on DB button, showed on Figure 22.
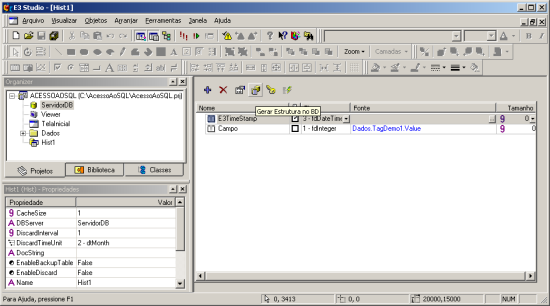
Figure 22: Creating the Historic structure on SQL Server
If there are no configuration problems or errors, the result will be the message shown on Figure 23.
In case of error alerts, the problem should be located. At the end of this tutorial, there is a list of possible occurrences that were tested and the results are listed there. Report to this list whenever it is necessary.
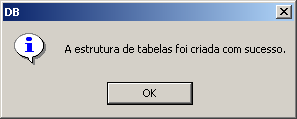
Figure 23: Expected result for the creation of table structure
To visualize the Historic in action, (saving data in the SQL Server), create a E3Browser object in the InitialScreen and set the consult to access the DB Server as set above, making the consult on the TabelaSQLServer configured in the Historic and set the E3Browser to be automatically updated every 10 seconds, for example. Figure 24 illustrates the consult to be created on E3Browser.
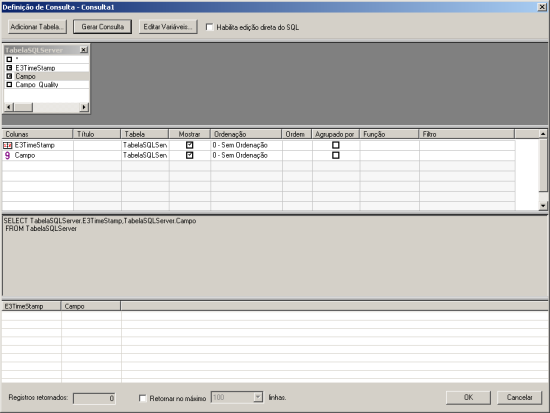
Figure 24: Consult on E3Browser
Using the project at Runtime
After configuring the project with the intent of visualizing the process, run the domain and check the behavior of the whole set. A good policy is to run in the clients the same consults implemented, for example, on the E3Browsers that access historic data saved by the project and check their behavior.
After some time running the Project, E3Browser will show the data that is being sent to the server. It is possible to consolidate the data that is shown on Elipse and the one that is saved in the server using the E3Query object on E3Browser (Figure 24) and the software SQL Query Analyzer. To do that, it is necessary to create different consults to the database and edit them on E3Query and also on Query Analyzer. The results should be the same, if the domain is stopped; or similar, if the domain is running. This difference happens because of the constant updating of the database when the domain is running.
To edit consults on E3Query, enable the option Enable direct edition in SQL.
Remote installation in option Clients
The initial steps for the SQL Server installation in all options are the same, through the definition of the features to be installed. Figure 25 shows the screen where the type of installation is defined.
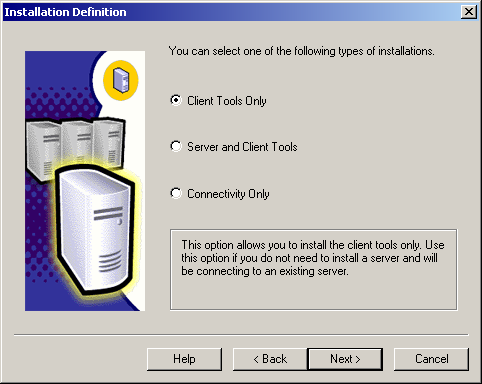
Figure 25: Clients installation option
On Figure 26, the options for components to be installed or removed are shown. Unless the use of all components is known, it is recommended not to alter these options. After this step, the installation will begin and after it is completed, it should be finalized by the user.
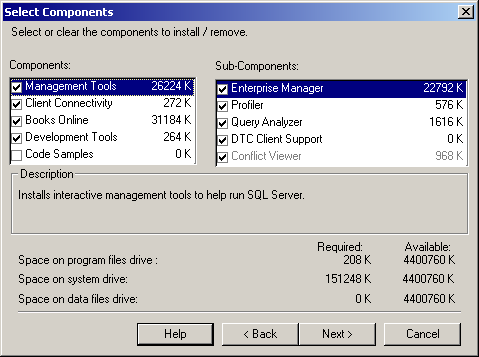
Figure 26: Options for components to be installed
Clients settings
After installing the SQL Server client software, it is necessary to set it to access the remote database of interest. There may be different servers in the same network, and the same client can have access all the available servers simultaneously. However, the configuration here presented shows the smallest structure necessary for the remote access of E3 to a SQL Server, be it local (in the same machine as E3) or remote (in different machines, but in the same network).
To begin the configuration of access to the SQL Server of interest, run SQL Enterprise Manager. Figure 27 shows the initial state of Enterprise Manager with no server registered. To register the server to which the connection will be made, click the SQL Server Group item and select New SQL Server Registration, as shown on Figure 28.

Figure 27: Enterprise Manager with no server record
Once the process is initiated the sequence of configurations follows the ones shown on Figures 29 to 35, where Enterprise Manager accesses the remote SQL Server.
To emphasize: the steps here defined only have the intention of illustrating the remote access use of a SQL Server database, and eventual failures in the procedures or modifications of used structures are of entire responsibility of the database user. To solve eventual doubts on the functioning of the remote access that is not covered in this article, consult the documentation on MS SQL Server 2000, or contact Microsoft technical support.
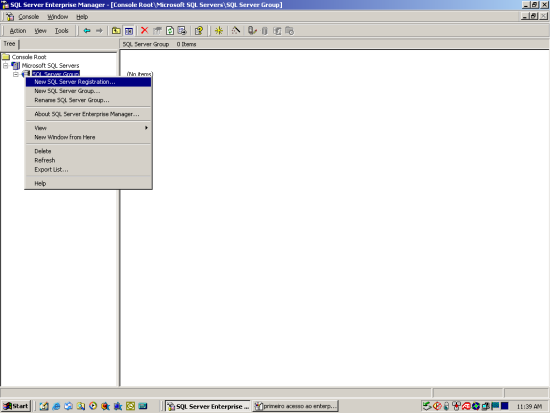
Figure 28: Beginning of the registration process of remote SQL Servers
After registering the available servers, the next step is to select which database(s) will be accessed through the network. When installing the clients in a remote machine, for the procedure here described, there were two SQL Server servers installed in the network. One of them was selected, as can be observed in the following steps.
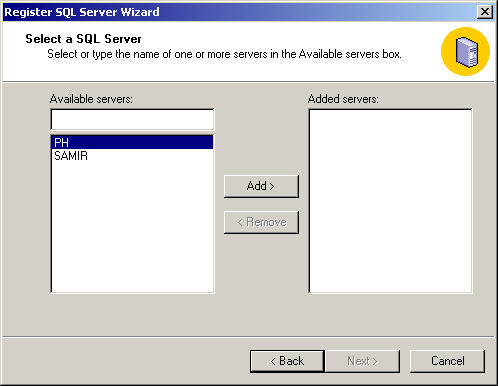
Figure 29: Servers available in the network
Like the complete installation, shown in the beginning of this article, the remote installation should also be done through authentication mode. This step can be done afterwards, as the step sequence will show. Figure 30 illustrates this step – which should be ignored.
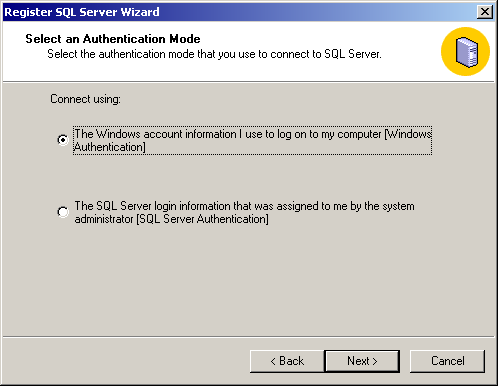
Figure 30: Defining authentication mode
Another screen that should be overlooked with no alteration is the one shown on Figure 31.

Figure 31: Selecting the SQL Server Group
After this step, the stage featured on Figure 32 is achieved, showing the server (or servers) registered in Enterprise Manager. To conclude the register process and make the first connection to the configured remote server, press Finish.
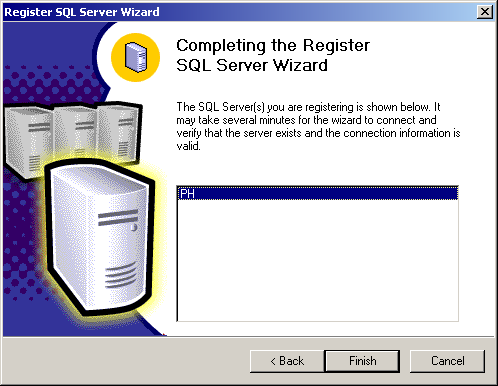
Figure 32: End of Registration Step
The registering process is finished. When pressing Finish, Enterprise Manager will connect to the registered SQL server and the result will be negative because the user authentication is not correctly configured. To show this, the screen shown on Figure 33 will appear. The parameters to be typed refer to the remote server, and the type of authentication should be Use SQL Server authentication, with the name and the password of the system administrator. In this case, the login is “sa” and the password is “sa”.
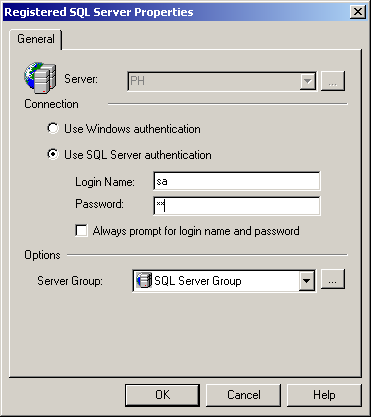
Figure 33: First connection to the remote SQL Server
As a definitive result, after the correct authentication of the server, Enterprise Manager will behave in the same way as shown in the local operation of the database server. Figures 34 and 35 show how the process of server registration is finalized and the result on Enterprise Manager after registration.
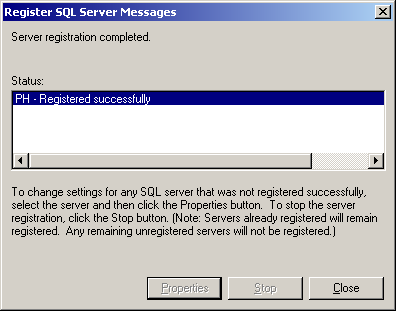
Figure 34: First registered connection to the remote server
To use more than one remote server, it is possible to repeat the registration procedure. It is important to remember that the server operation will maintain independently: they will be in different machines, storing different data, with no logical or physical connection between them.
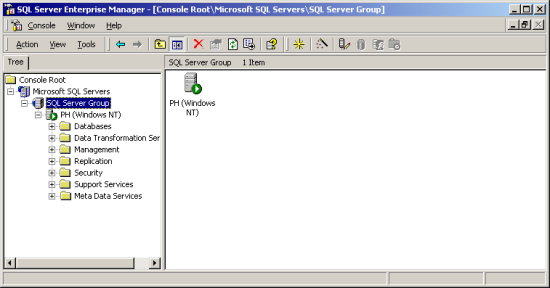
Figure 35: Registered remote server
Components
Enterprise Manager
It is used to administer MS SQL Server. The available features that are necessary to the communication of E3 with SQL Server (locally or remotely) were illustrated in this document. Any additional information may be acquired in the component documentation or with Microsoft technical support.
Service Manager
The correct way to configure the operation of MS SQL Server is through the component SQL Server Service Manager. It indicates the servers available in the network and the services available for each server. This article presents only the use of SQL Server service but there are others with unknown and irrelevant purposes for the intention of this article.
In short, to run or stop the execution of MS SQL Server, use Service Manager.
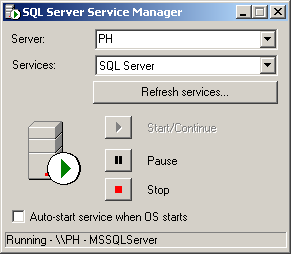
Figure 36: Interface for Service Manager
SQL Query Analyzer
SQL Query Analyzer is the available component for consults to the database. Through this component, all necessary consults to objects of an E3 project can be tested.
The whole body of available functions in the standard SQL language and the specific extension of each server are relatively wide. This way, in case of a more elaborate consult involving calculations or data from different tables (joins), it is interesting to test the consult in this SQL client.
In addition to that, this component is useful to verify the correct sending of data from E3 to the server. This way, it is possible to locate problems when the E3-SQL Server system does not work appropriately.
Figure 37 shows the standard interface for SQL Query Analyzer.

Figure 37: Interface for SQL Query Analyzer
All SQL Query Analyzer features are limited to permissions granted by the logged user. However, to check the possibilities of acting on a database such as data search, calculate administrative values and functions through SQL, all options are shown in this component with the E3 user.
Use of ADODB to access through Scripts
To access SQL Server through scripts an ADODB connection is used. The connection string to this kind of database follows the model defined bellow:
The use of this type of access must be restricting to cases where there is no other solution. E3 disposes of features that aim to minimize the use of these accesses through scripts. However, the use of this feature may be necessary, eventually.
Error description
Procedures for locating errors
In this section, some of the possible errors are listed. In case of problems, the correct procedure to find an error is:
- Check connection parameters.
- Check if database server is active.
- Use Enterprise Manager or Query Analyzer, logging with the same user as E3.
- Check if E3 can save data in the database using a consult through Query Analyzer: in case it is not possible, check E3Logs to detect the error presented and look for it in the list.
- In case E3 correctly saves data, the problem probably is in the consults. Review one of them and, in case the problem is not solved contact technical support (contact numbers are listed at the end of this article).
Error documentation
Errors described on E3Logs are descriptions provided by ADODB, an object available on Windows for database connection. For this article, some errors were forced and, based on these forced errors; a list was made indicating the possibilities. The creation of a historic table (Figure 22) was used to force errors.
To enable the generation of logs on E3, create a folder “C:\E3Logs“. All actions performed by E3 (be it Studio, Viewer or Server) are registered in the files on this folder.
Wrong name of Server in the configuration of DBServer
Wrong user name
Wrong password
Non-existent database
Database out of order
Two tables using primary keys or indexes with the same name
All these errors are described in the log file with the name in the format ‘E3_YYYY_MM_DD.log’, where YYYY is the year, MM is the month and DD is the day the file was generated.
It is recommended that the log folder is kept only for error searches, for there is no limit to the creation of files, and in time the file size may become bothersome for the system.
In case of doubt contact technical support at Elipse Software.
Responsibilities over procedures
This article aims to present the smallest set of necessary definitions and configurations for the communication between Elipse E3 and MS SQL Server.
For a secure and efficient operation of a database system it is necessary to previously evaluate the available features needed for this operation. The choice for this software is for the innumerous advantages that it brings regarding saved files in the Access standard that are used on Elipse E3. However, operating and administering these database managers is not of Elipse Software Ltd. competency, once the implementing of a system like this requires specific skills that are acquire with training offered by the provider of the system, be it Microsoft, Oracle or any other that wishes to constitute a project with Elipse E3 or SCADA. That being said, it is not Elipse’s responsibility any chances or failures in the procedures here described. On a final note, it is important to point out that the procedure here described was not endorsed by manufacturers or distributors for database manager systems, serving only as a learning reference.
Procedures were created using an evaluation copy of SQL Server 2000, as can be seem in the description for installation.
