Question:
Can I set up an application to use a monitor matrix?
Solution:
Yes, you can. This tutorial shows you how to set up an application that uses two or more standalone monitors, and also how to change the total amount of monitors and their physical configuration with little need for interventions in the application, based on the sample application attached to this file.
In order to be easily configured, this application uses
- an exclusive Frame object for each monitor, instead of a unique frame for all monitors.
- an initialization script at Viewer object.
- an XObject created for these specific purposes.
For this example, the application had the following settings:
- four 2×2-monitors, i.e., a 2×2-monitor matrix.
- a fifth monitor to be opened in a big screen when the application is running, regardless of the other four monitors.
- screens configured to be opened in 640×480 resolution, in order to enable you to view this example in a single monitor with fullHD resolution (or similar).
These settings can be changed afterwards, with no need to alter the frames that were previously generated.
Step 1: Creating and configuring Frame objects
First, define how many types of frames your application will have; after that, create these objects in E3.
In the example, two types of frames were defined:
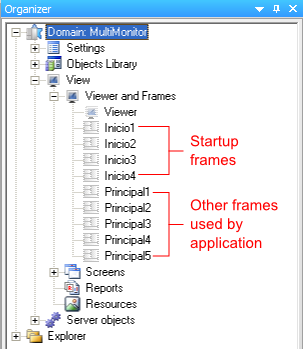
- Startup frames: frames to be loaded when the application starts. In the sample application, they are called Inicio, because they are loaded by the Viewer during startup.
- Production frames: other frames used by the application after startup, whose name varies according to its function (here, they are called Principal).
Other types of frame can also be created, with any other name, but their splitter must have unique names in the application and be numbered according to the parent frame:
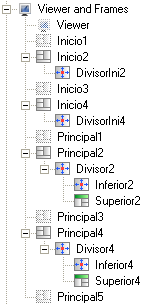
Notice that there are four Inicio frames, but five Principal. This happens because, in this example, a fifth monitor can be opened after the application has started. Since this fifth monitor will not be opened during startup, you will not need a frame called Inicio5.
Step 2: Instancing and configuring xoConfigMonitor‘s data type
Data type of xoConfigMonitor must be instanced at Dados folder:
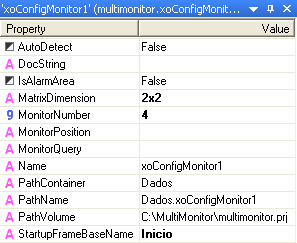
This type’s settings are
- AutoDetect: automatically detects the dimensions of the main monitor and opens the initial frames with these dimensions, when enabled.
- MatrixDimension: sets size and distribution of the monitor matrix. Write it in the following format: RxC, where R = number of rows and C = number of columns. Its value must be consistent with the one set at MonitorNumber.
- MonitorNumber: sets the total number of monitors. It must be consisted with the value at MatrixDimension.
- StartupFrameBaseName: sets the base name for the cluster of startup frames.
Step 3: Configuring Viewer object
In the example, the Viewer has a startup script which is executed at OnStartRunning event. This script must be copied to your application.
Next, configure the Viewer’s properties on Settings tab like this:
- select the option Start windowed.
- insert the dimensions of the main monitor.
This concludes the application’s configuration process for using monitors matrices. To personalize its settings, consider that
- if you want to reduce the total number of monitors, change xoConfigMonitor‘s MonitorNumber and MatrixDimension properties, and it will not be necessary to change or exclude any of the existing frames.
- if you want to increase the total number of monitors, create the corresponding frames ad update xoConfigMonitor‘s MonitorNumber and MatrixDimension properties.
- if you want to change the physical disposition of the monitors matrix to a value different from 2×2, just change xoConfigMonitor‘s MatrixDimension property.
- if an invalid value is typed at xoConfigMonitor‘s MatrixDimension property, only the main monitor will be opened.
Attachments:
