XObject
XObjects are data libraries which allow configuring a data structure to execute on the server. This structure can perform calculations, links, communication, alarm acknowledgement, historic recording, and much more.
To insert a new XObject in a Library, follow these steps:
- Right-click the XObjects, select the option Insert XObject in and then click the library file.
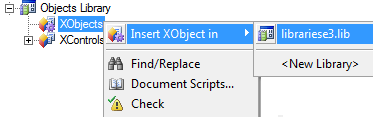
Figure 1
- Change the name
XObject1to any other suitable name.
When installing an XObject, there are two tabs on the lower side of the screen, Properties and Scripts. Because an XObject is a data structure, not a visual object, there is no Design tab.
In an XObject, it is possible to insert XProperties and any E3 module running on the server:

Figure 2
Developing XObjects
As you already have a Library file, you can create XObjects.
EngineTag
As an example, let’s develop an application which monitors the maintenance state, failure, and speed of each engine. Besides, in case the engine is on failure, an alarm must be triggered.
- Insert a new XObject named
EngineTag. - In the Properties tab, create three properties:

Figure 3
- Insert an Alarm Configuration object in the XObject.

Figure 4
- In the Alarm Configuration object, create an Area named
Engine. - In the
Enginearea, insert a Digital Alarm namedFailAlarmto monitor the Fail property of the XObject.

Figure 5
- Right-click the
FailAlarmobject to access its properties, and choose a message for this alarm.
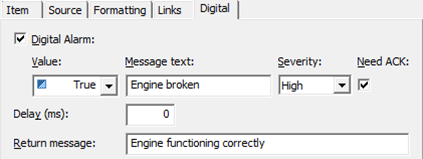
Figure 6
- Save and register the Library.
Using an XObject
Follow the next procedures to use the XObject:
- In the Data Server, insert three objects of type EngineTag,
Engine1,Engine2, andEngine3.

Figure 7
- In the
InitialScreen, create three buttons of type ToggleButton,Engine1,Engine2, andEngine3. - Create a Bidirectional Link between the Value property of each button and the Fail property of its respective engine.

Figure 8
- Near each engine button, insert a Display to view the RPM. Make a link with the RPM property of the respective
EngineTag. - To view the alarms, insert an E3Alarm object on the Screen.
- In the E3Alarm, configure the Alarm Server Name property. In case there is no server available, insert an Alarm Server in the Domain.

Figure 9
- Execute the application.
Getting values
The XObject is a data structure with several properties. These properties can get values from other objects using links or scripts.
- In the Data object of the Data Server, create three Demo Tags named
RPM1,RPM2, andRPM3of type Random.

Figure 10
- Create a Simple Link between the RPM property of each TagEngine (
Engine1,Engine2, andEngine3) with the respective Demo Tag.
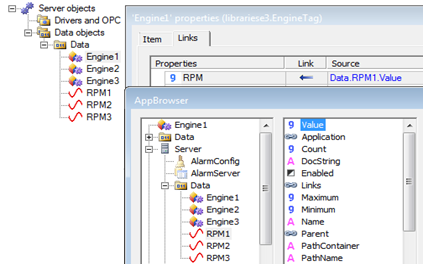
Figure 11
- Execute the application.
Exercises
Maintenance Time
Now, let’s create an object which triggers an alarm if the device is turned on for more time than the recommended.
- Create an XObject named
MaintenanceTime. - In the Properties tab, create the following properties:

Figure 12
- In the XObject
MaintenanceTime, insert a Data Server namedData.
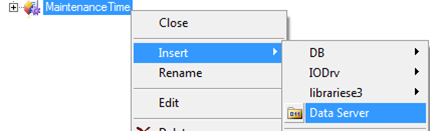
Figure 13
- In the Data folder, insert a Counter Tag named
Counter.
![]()
Figure 14
- Change the CounterType property of the
Counterto 1 – Infinite. - Create a link in the Counter Tag so that its value can be sent to the OnTime property.
- The property to enable or disable (Enabled) the Counter Tag must be linked to the OnOff property of the XObject.
- Insert an Alarm Configuration in the XObject.
- Create an Area with a Digital Alarm for OnTime – MaximumTime.
- Save and register the Library.
- Insert three MaintenanceTime objects in the Data folder,
Time1,Time2, andTime3. - Insert on the Screen a button of type ToggleButton, a Display, and a SetPoint. The button must be linked to the OnOff property, the Display to the OnTime property, and the SetPoint to the MaximumTime property of a MaintenanceTime object.
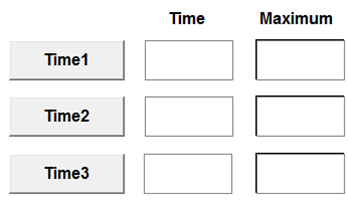
Figure 15
- To view the alarms, insert on the screen an E3Alarm object and check if there is an Alarm Server object on the Domain (create one if not).
- Execute the application and test its functionalities.
ValveTag
Let’s create an object which saves a historic of failure, open, or closed statuses of all valves in the database.
- Create an XObject named
ValveTag. - In the Properties tab, create the following properties:

Figure 16
- Perform the following configuration:
- When the Open property is true, the Text property must be “
ValveNameopen”, and when the property is false, the Text property must be “ValveNameclosed”. - When the Fail property is true, the Text property must be “
ValveNameon failure”, and when the property is false the Text property must be “ValveNameworking normally”.
- To save the text in the database, insert a Historic object in the XObject
ValveTag. - In the Historic, insert a field named Message to store the Text property of the
ValveTag. - O Histórico deve gerar a tabela Valvula e gravar um novo registro sempre que o texto for alterado.
- Save and register the Library.
- Insert two ValveTag objects in the Data folder,
Valve1andValve2. - On the Screen, insert two buttons of type ToggleButton and one Display. One button must be linked to the Open property, the other one to the Fail property, and the Display to the Text property of the ValveTag object. Do this for the other two objects inserted.
- Execute the application and test its functionalities.
Attachments:
