1) Introduction
The Scripts Editor is an E3 tool that allows you to create codes in VBScript linked to events, which perform tasks regarding the application. These codes allow a greater flexibility in the development of E3 applications, leaving up to you to define what should be executed when a given event takes place.
Such a tool must have several characteristics, such as practicability, flexibility, and clarity, so that development time is not compromised. With the launch of version 2.0, E3 got a completely improved scripts editor, with clearer presentation, and new resources that make its use simpler.
Throughout this file, you will see the Scripts Editor’s new features. These features were developed to better meet your needs, especially regarding extensive scripts.
2) What is new
The new look of the Scripts Editor shows some of the resources from older versions in a different way. In other words, the resources still work the same way, but now they are accessed differently.
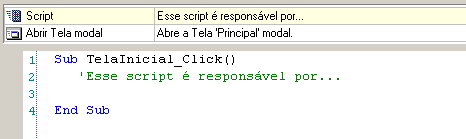
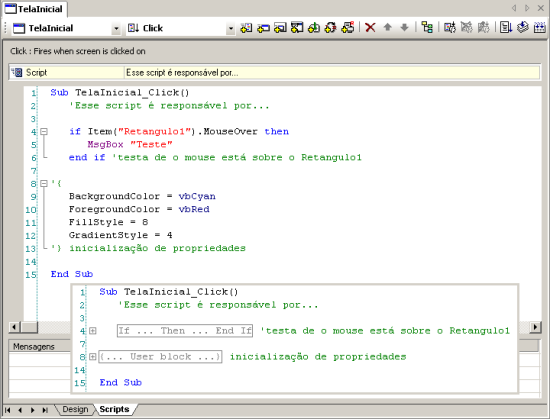
The new Scripts Editor is now accessed through a new visualization mode. This new mode displays two tabs: Design, with the object’s view, and Scripts, with the editor’s view. Previously, the editor was accessed through the object’s Properties Window. Now, the editor has more space, which makes it easier to develop codes.
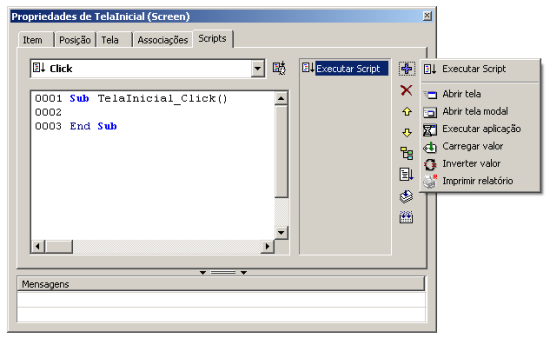
Picture 1: Old Scripts Editor, linked to the Properties Window
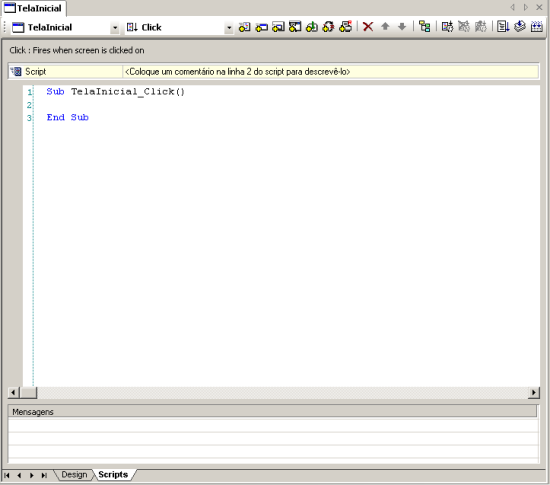
Picture 2: New Scripts Editor, with its own view
Scripts tab is synchronized to Design tab in each object, which means that when you switch between them, the object selection made in the previous view is maintained. For example, in the case of a Screen Object, it is usually easier to locate the object by visualizing its position on a Screen than by finding its name in an objects list. In this case, the selection’s synchronism is important.
The resources that were previously available to the window’s right, through buttons and menus, are now gathered on a toolbar. That way, it is easier to see the options available for the picked object: the objects that cannot be used become disabled. It is also easier to add a pick, because the Toolbar has a button for each available pick, in addition to a button to add scripts. Therefore, the process of creating user events is on step shorter. The options for creating, editing, and removing events are detailed on the Toolbar.
If you prefer, the Toolbar can also be placed below the view.
3) New resources
The Scripts Editor has not only a new look, but also new resources that help develop your application. These resources are important because they accomplish functions that were not previously available, or that were too complicated, in an easier way. With that, you get more development time, and also more clarity in your projects.
Choosing objects
The new Toolbar brings an option that allows selecting the object whose script you want to view. In the old model, the script being shown always belonged to the object selected in the Organizer, and it was only possible to select events. Now, this new option allows you to select between the root object (Screen, Data Server, etc) and its child-objects, just by selecting it on the bar.
Another feature is, once “Scripts” tab is visible, you can switch selections in the Organizer without losing sight of the script you were editing. This is very practical when, for example, it is necessary to check an object’s property when editing another’s script. Before that, any changes in the Organizer would reflect in the scripts editor, for it was part of the Properties Window.
The event’s combo box maintains the same behavior of the older version: events with scripts are displayed in bold, at the top of the list. The next sorting criterion is alphabetical. Similarly to what happens to events, the name of objects that have scripts are in bold on the Toolbar’s combo box, but their order is not changed. The first object on the list is always the one which has the “Design” tab linked to itself. The names of the child-objects are sorted out alphabetically, right after. Names with special characters come between brackets.
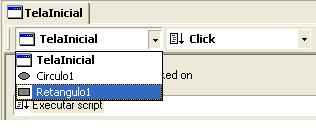
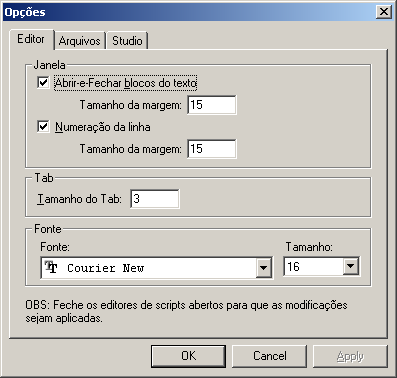
Picture 3: Names in bold indicate the presence of scripts
Direct access to scripts are easier
Another configuration option was created to facilitate the access to the Scripts Editor. Through the menu Tools—Options, it is possible to define the object’s behavior when double-clicked in the Organizer.
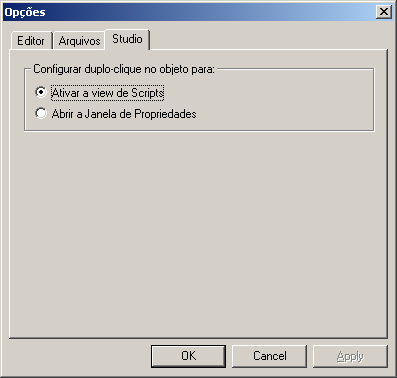
Picture 4: Double-click configuration
The old behavior was to open the Properties Window, from where you could access the Scripts Editor. To enable this same behavior from the editor, it is possible to define that the double-click on the object will open the Scripts tab. This behavior is for when the object’s view is already open, and applies both for the root-object (Screen, Data Server, etc) and their child-objects, which in turn will open the root-object’s view.
Events description
Below the Toolbar there is a brief description of the selected event, be they default events or user-events. In the latter, the description is made based on the event’s definition, giving you a precise idea of when the event will be executed. This makes the identification of the event you intend to use easier: just select it and the description will appear automatically.
Picture 5: Events description
Actions list with descriptions
The list showing the scripts and picks created for a given object in a certain event now also shows a description of what this action does. In the case of picks, the description is filled automatically according to the values input in each pick’s field. In the case of scripts, you can supply the description simply by adding a comment on script’s line nr. 2.
Picture 6: Actions list with descriptions
Copy-paste via actions list
Another new feature form the actions list is that you can move or copy scripts from elsewhere, even between objects. The actions list now has a context menu with the options Cut, Copy, and Paste.

Picture 7: Cut, Copy, and Paste options for a pick or script
Just right-click on the pick or script and choose the option (“Cut” or “Copy”). Then, chose a target object and even, and select “Paste”, which will only be available if copies are permitted (for example, picks are not allowed in server objects). For scripts, the name of “Sub” is automatically corrected according to the object and event selected.
Syntax colors
Some changes were made in the color system of the script’s keywords, aiming at a better visual identification. One of the changes is that from this version on, words in bold are not used anymore, which gives it a lighter visual. Another change is that now VBScript’s functions and constants are highlighted with the following colors:
- Control structures (if-then-else, …): blue.
- Operators (not, and, …): blue.
- Reserved words (empty, null, true, false, …): blue.
- Functions (abs, cbool, RBG, msgbox, …): purple.
- Strings (delimited by quotation marks): red.
- Comentários (‘ or rem): dark green.
- Constants (vbRed, vbNo, …): dark blue.
Code outlining
Another resource that is very helpful when working with extensive scripts is called “Outlining”. With this resource, it is possible to hide bits of code that are not relevant in a certain moment, and show them again when necessary. This does not affect the functioning of scripts, because hidden code bits are saved, compiled, and executed normally.
All VBScript’s control structures generate blocks that can be hidden. In addition, a generic block was defined, called “User Block”, which can be inserted into any part of the code. A “User Block” starts with a ” ‘{ “, and ends with a ” ‘} “.
NOTE: user block’s delimiter’s were chosen to start with a ‘ so that they do not interfere with the script, since this symbol identifies a comment. So, after start and end delimiters you must not write any code, because the language interprets this as a comment and therefore they will not be executed. However, you can use this characteristic to describe a hidden block by placing a comment after the end delimiter, as you can see in the picture above.
Scripts Editor’s new settings
Alongside the new resources, the Scripts Editor also brings new configurations. They can be made through the menu Tools—Options. In addition to the pre-existing ones, such as font type and size, it is now possible to configure:
- Showing or hiding the option to hide code blocks.
- Margin size to contain block marks.
- Showing or hiding line numbering.
- Margin size to contain line numbers.
Picture 9: Scripts Editor settings
4) Final Remarks
The changes in the Scripts Editor aim at increasing productivity in applications development as a whole, which in turn improves the use of scripts.
The old editor was displayed alongside the object’s properties window, limited to showing just one object at a time. With the new editor’s display, in a view connected to the main object, it was possible to group the object and its child-objects in one place, making it easier to search for them. The new look has also made it possible to have a wider place for scripts edition, which was previously restricted to the properties window. This space can get even larger, if you use the resources of auto-hiding Organizer’s, Gallery’s, and Properties List’s windows.
The available functions, which were previously grouped in buttons with menus, needed several clicks for access. With the toolbar, they became more accessible, via a simple click. In addition to these and other improvements, the new resources help turn this new editor into a powerful scripts edition tool at E3.
