1) INTRODUCTION
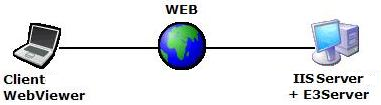
This article illustrates how to set up the server to make Elipse E3 applications available on the Internet via IIS. As a result, the WebViewer can connect to it via an Internet browser.
The WebViewer is an ActiveX similar to the Viewer, but designed to run inside a server. Therefore, only browsers supporting ActiveX can run the WebViewer.
The IIS (Internet Information Services) is an integrated set of network services for Windows platform that allows you to publish content and provide files and applications in an Internet or Intranet environment. Totally integrated to the operation system and equipped with an 100% graphic administrative interface, the IIS is one of the best options available for website, FTP, and newsfeed hosting, as well as for developing applications.
There are two types of settings available for setting up E3 servers and IIS. Before doing so, however, you must make sure the E3Server is installed in a Domain running properly.
2) USING E3SERVER AND IIS IN THE SAME SERVER
With these settings, a WebViewer connects to Elipse E3 via Internet in the same server as the E3Server available on the web and published by IIS. To do so, follow these steps:
Step 1: Firstly, copy the necessary files to the IIS installation directory (usually C:Inetpubwwwroot):
- e3web.asp and docwrite.asp: loads and starts the ActiveX E3Downloader.
- e3downloader.cab: ActiveX to be sent to the client machine to install e3webviewer-x86-ptb.exe.
- e3web2.asp and docwrite2.asp: loads and starts the WebViewer ActiveX that shows the application being executed in the Internet Explorer machine.
- e3webviewer-x86-ptb.exe: loaded by the browser when typing the application’s path. Since this file does not come alongside E3’s installation, it must be downloaded from Elipse Software’s website; therefore, it must necessarily come from the same version and build as the E3Server being executed in the server as well as placed in the same file folder listed above.
NOTE: Every time the E3Server is updated, all files above must be updated in the IIS directory. In version 3.1 or lower, E3 Web Viewer’s installer had a different name (e3-w98webviewer.exe, e3-w2kwebviewer.exe).
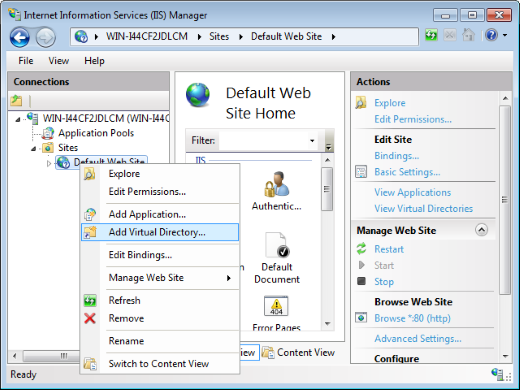
Step 2: Set up the IIS (found in all Windows operating systems). To do so, right-click Default Web Site and select Add Virtual Directory.
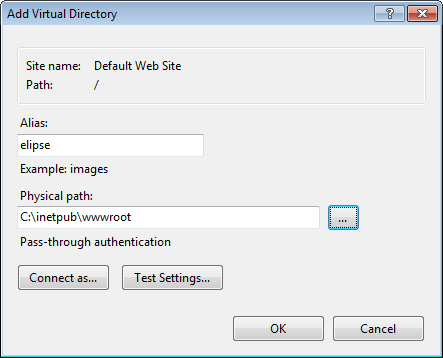
Step 3: Go to Alias and choose a name for it. Make sure to write it down, because you will need it for accessing the directory in the browser’s address bar. At Physical Path, click “…” and select the directory where the files have been stored (in this example, c:inetpubwwwroot). Click OK.
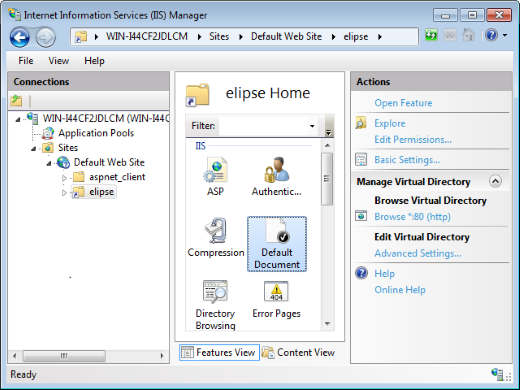
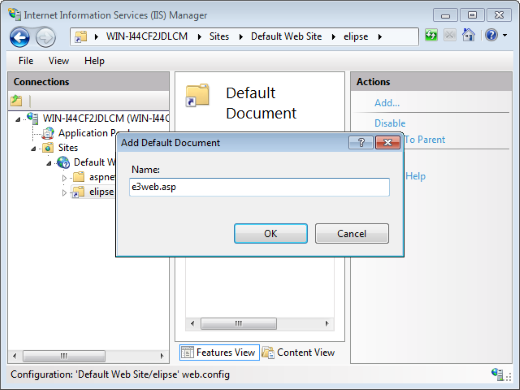
Step 4: Click the virtual directory, which is at Default Web Site, and select Default Document.
Step 5: Click Open Feature and then Add at Actions; then type “e3web.asp” at Name anc click OK.
After these steps, the client computer can access the web server used by Internet Explorer.
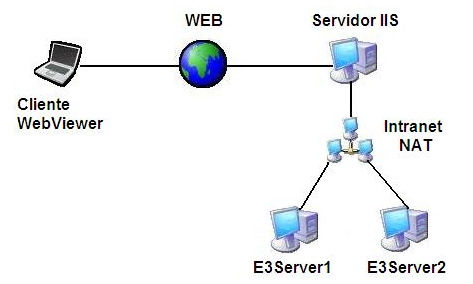
3) USING E3SERVER AND IIS IN DIFFERENT SERVERS
3.1 Settings for a single E3Server
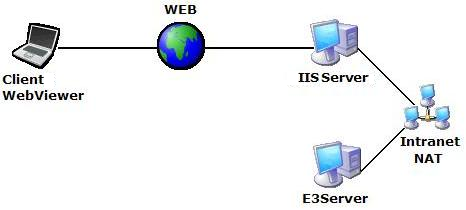
With these settings, a WebViewer connects to Elipse E3 via Internet to a E3Server available on the web that is not necessarily the same server where IIS is. To do so, follow these steps:
Requirements for the web server (running IIS)
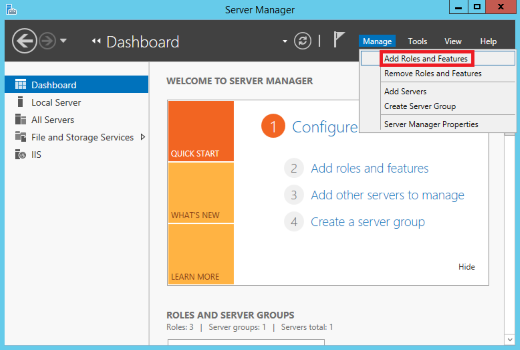
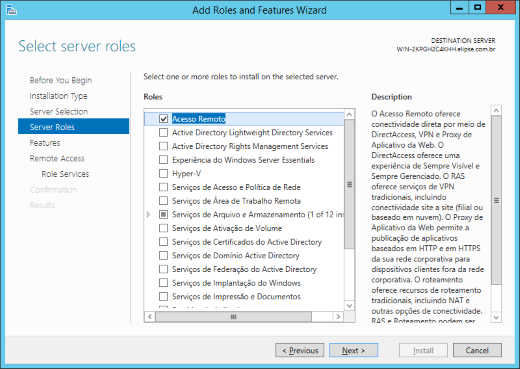
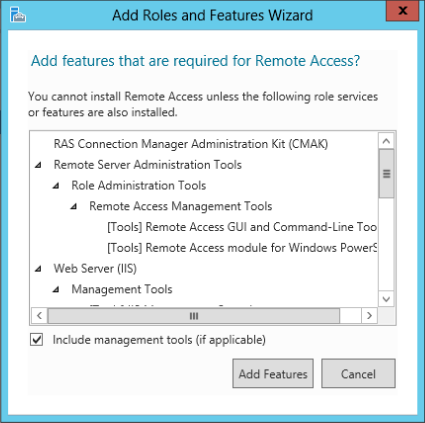
Pre-requisite: the IIS server must be installed in the Windows Server platform, because this is where the Routing and Remote Access feature is.
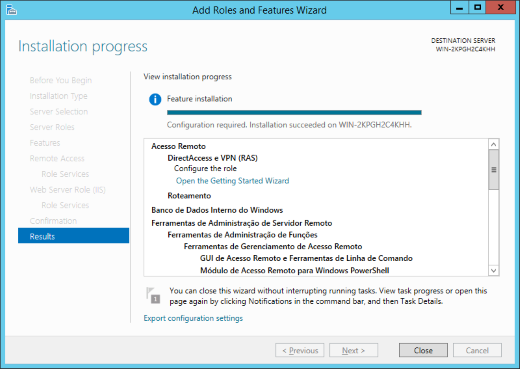
Installing routing and remote access in current Windows Server versions

Follow installation progress until it finishes.
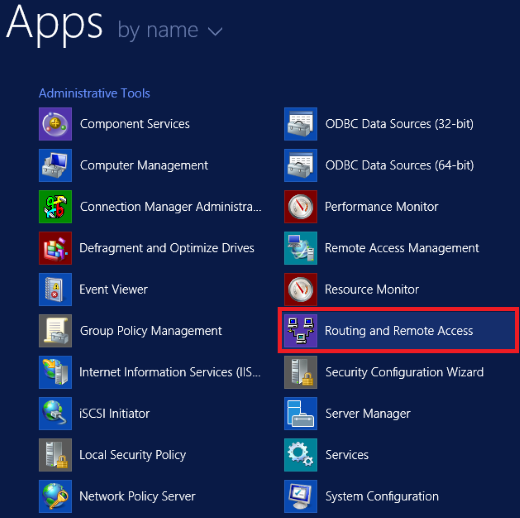
Setting up Routing and Remote Access
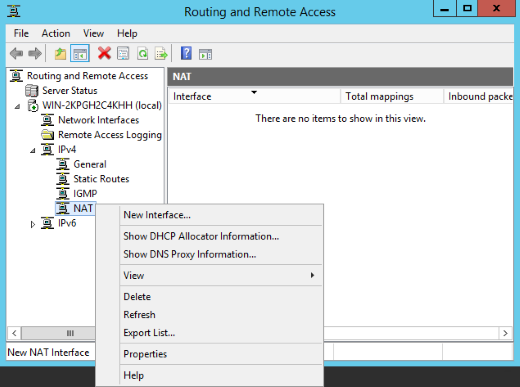
Step 1: Firstly, access Routing and Remote Access.
Step 2: After that, access the list with IIS servers, and open the server’s items tree until you get to NAT.

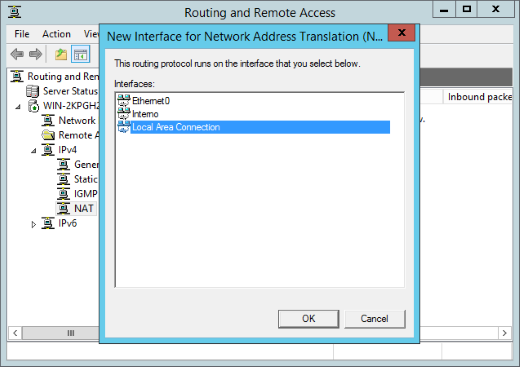
Step 3: Then, pick New Interface.
Step 4: Select the interface that will expose the computer to the E3Server on the Internet. Pick the network device connecting to the Internet, no the one connecting the IIS server to the intranet.
Step 5: Check Public interface connected to the Internet. This means the interface with the E3Server computer will be public, and therefore other computers will be able to send and receive data with it.

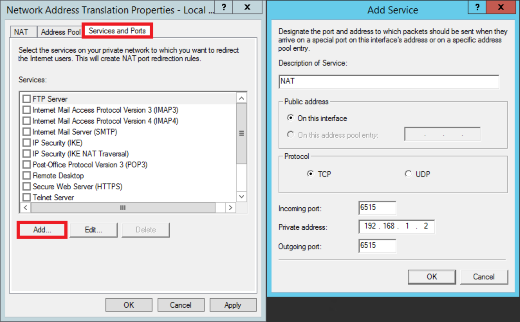
Step 6: Set up the computer on the network that will work as the public interface (in this case, the computer with the E3Server). The input and output ports must be respectively port 6515 (used by E3Server for communication purposes) and the computer IP (Private address).
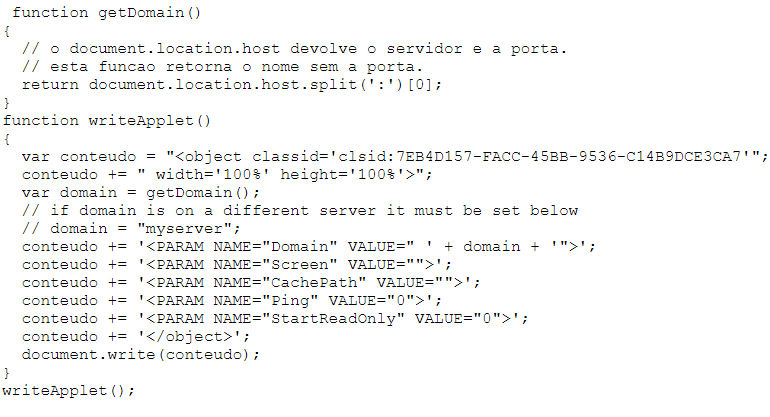
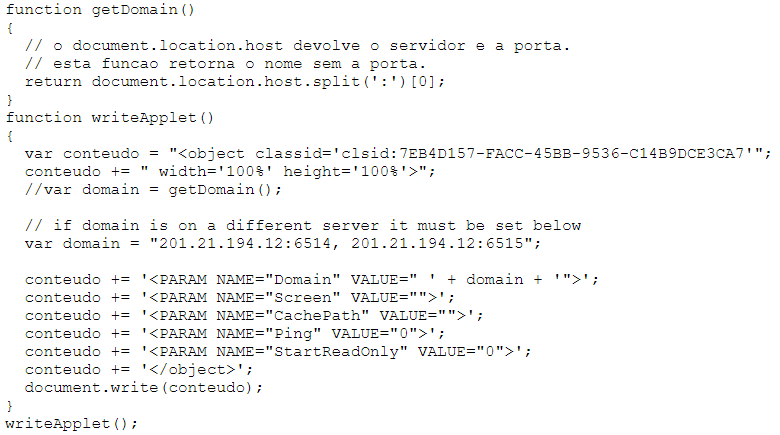
Step 7: At Notepad, open the docwrite2.asp file published by IIS and substitute the following line:
var domain = getDomain();
with:
var domain = IP externo do Servidor IIS";
Below, there is the complete code for docwrite2.asp:
NOTE: If you’re using an older version of Elipse E3 (v. 3.0 or lower), you will need to edit file e3web.asp. To do so, open e3web.asp file published by IIS on the Notepad and substitute the following line:
< param name="Domain" value="\<%= Request.ServerVariables("SERVER_NAME")%>">
with:
< param name="Domain" value="IP externo do Servidor IIS">
E3Server settings
Install Elipse E3 and execute the preferred domain. After that, the IIS Server and E3Server will be configured and ready to use.
3.2 Settings for applications in hot-standby
With these settings, a WebViewer will first evaluate the statuses of the servers available on the Internet and then connect Elipse E3 to the active E3Server, which may not necessarily be in the same server as IIS.
NOTE: These settings will work only with Elipse E3 version 3.0 build 416 or higher.
To do so, follow these steps:
Requirements for the web server (running IIS)
Pre-requisite: the IIS server must be installed in the Windows Server platform, because this is where the Routing and Remote Access feature is.
Follow Steps 1 through 5 above. Since the two E3 servers are able to receive external connections, you will need to make them both available on the Internet; therefore, you will need to execute Step 6 twice. The first execution is the same as the one above; the second must be configured as follows:

In this case, Incoming port must have a different value (that is, different from 6515); the Private address, on the other hand, must be the IP of the second computer.
The next step is to edit docwrite2.asp file so it will point to the servers involved in this configuration. To do so, substitute the following line:
var domain = getDomain();
with:
var domain = "IP externo do Servidor IIS:porta1, IP externo do Servidor IIS:porta2";
The domain variable in this case will inform E3WebViewer to which IPs and ports it must connect.
Below, there is the code for docwrite2.asp already edited for this example, with IP 201.21.194.12 published on the Internet:
NOTE: If you’re using an older version of Elipse E3 (v. 3.0 or lower), you will need to edit file e3web.asp. To do so, open e3web.asp file published by IIS on the Notepad and substitute the following line:
< param name="Domain" value="\<%= Request.ServerVariables("SERVER_NAME")%>">
with:
< param name="Domain" value="IP externo do Servidor IIS">
E3Server settings
Install Elipse E3 and execute the preferred domain. After that, the IIS Server and E3Server will be configured and ready to use.
4) INCREASING ACCESS SECURITY
You can not only restrict access to the domain via Internet with Elipse E3, but also increase the level of security via the IIS configurator. Corporate networks organized under the same domain can benefit from this level of security, because the domain’s usernames and passwords are not required for accessing the website.
To do so, follow these steps:
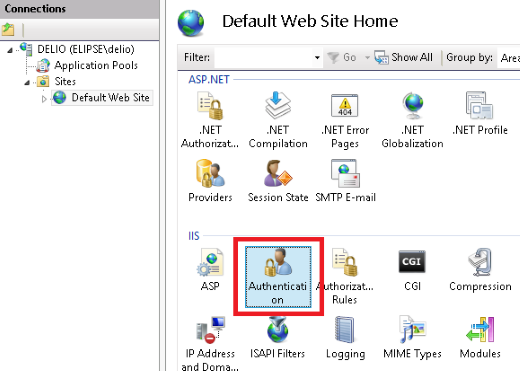
Step 1: Select Default Web Site, and then open Authentication.
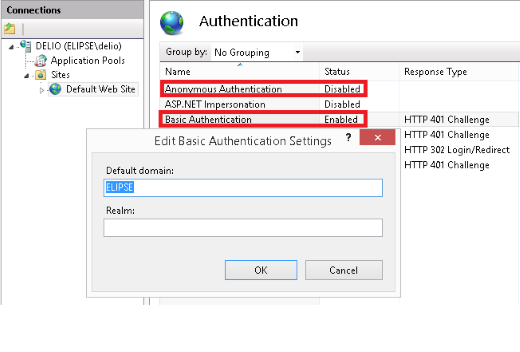
Stpe 2: At Autentication, uncheck Anonymous Authentication and then check Basic authentication.
Select Basic Authentication, click Edit, and then write the domain’s name.
Client settings
Any user, as long as properly authorized by the company’s security and access policies, will be able to view and control an Elipse E3 application on the Internet from its browser. Basic requirements are:
- PC with Windows 2000/XP/2003/Vista
- Internet Explorer 5.5 or higher
- Access to the Internet
To do so, just point to the address of the server where the application has been hosted. Example: http://servidor/diretoriovirtual.
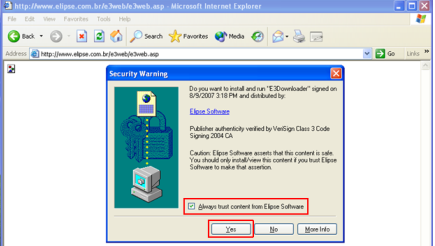
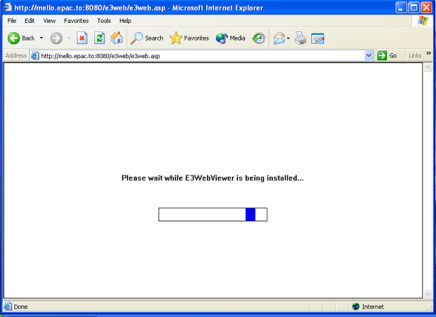
E3Downloader will download E3WebViewer’s installation. Click Always trust content from Elipse Software and then Yes. After that, a message will pop up informing that the E3WebViewer installer is downloading, as seen below:
After the installation process, WebViewer will open on the browser and allow you to view the application in the server.
