** This article shows how to handle programs that close unexpectedly when using Elipse platforms, especially after version 6.0. It applies to the following operating systems: Windows Vista, Windows 7, Windows 2008, and Windows 10 **
Introduction
Under abnormal working conditions, some untreated exceptions in the software may occur, which may in turn cause programs to close unexpectedly for several reasons. Depending on the system, when it happens, either the application can be automatically closed or the user can be informed that the program is no longer working and will then be closed, in a message similar to the one in the figure below.

Figure 1: Exception/general failure message
Most of the times, to identify the exception/failures occurring with the software (including Elipse E3 and Elipse Power), you will need Windows’s logs.
Version 6.0
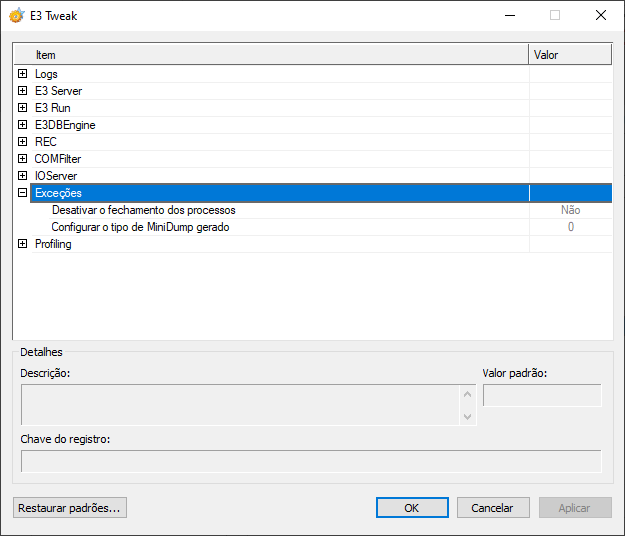
However, from Elipse E3’s and Elipse Power’s version 6.0 on, the default has been: E3 processes generate MiniDumps in the logs folder (C:\eeLogs\E3) whenever exceptions or serious failures are detected.
You can disable this behaviour via Disable process termination option in E3 Tweak. Additionally, you can set up the generation of minidump files for GPF (General Protection Failures) analyses at Configure the MiniDump generated option. For further information on the possible values for this option, check out Microsoft’s documentation on the subject.
Previous versions
With Windows XP or other previous versions, it was possible to use DrWatson, which did not need any specific settings to record logs. With newer systems, on the other hand, although you may also count on Windows-generated logs, you will only be able to find them at WER (Windows Error Reporting), which needs specific settings to generate such logs.
WER’s default behavior is to send the errors to Microsoft. However, the process of sending them to Elipse Software may take too long. Thus, the settings suggested in this article are meant to speed this process up, allowing the errors to be captured locally and the logs to be sent to Elipse.
Below are the procedures for setting up the system to generate the logs.
Step 1
1. Change some values in a Windows registry key, with can be accessed via registry editor (Regedit.exe) in:
HKEY_CURRENT_USER\Software\Microsoft\Windows\Windows Error Reporting
To perform these settings, just establish the values for each variable according to the two figures below. (NOTE: neither Windows 2008 nor Vista will require the step shown in Figure 2).

Figure 2: Resetting the variables’ values at WER folder
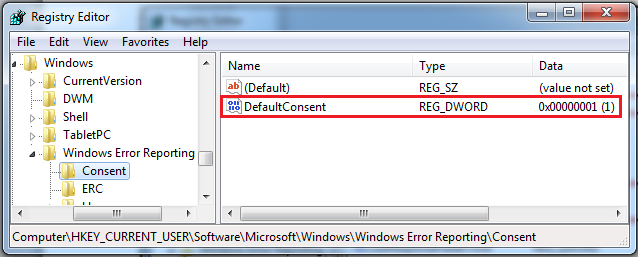
Figure 3: Resetting the variables’ values at Consent folder (only for Windows 7)
The same keys inserted/edited above need to be added to the path below:
HKEY_LOCAL_MACHINE\Software\Microsoft\Windows\Windows Error Reporting
In some cases, E3Run’s and E3Server’s GPFs happen to SYSTEM user;
since there is no user logged in the computer, the settings for a specific user may not be valid.
Step 2
2. In E3 Tweak change the Exceptions key to “Yes”.
Step 3
3. After the regedit changes, you can access the reports via Control Panel. To do so, follow one of the paths below, according to the desired system:
- Windows 10: Control Panel >> System and Security >> Security and Maintenance >> Maintenance >> Display reliability history >> Display all troubleshooting reports
- Windows 7 and 2008: Control Panel >> System and Security >> Action Center >> Maintenance >> Display reliability history >> Display all troubleshooting reports
- Windows Vista: Control Panel >> System and maintenance >> Issues in reports and solutions >> Display troubleshooting reports
Select Display all troubleshooting reports. This will cause Windows to generate DUMPs whenever any other issue takes place.
Step 4
4. Find the issue on the list, access its menu by right-clicking the error, and choose the option Display technical details. When pressing this button, the data for the exceptions will appear, as seen in Figure 4.

Figure 4: Error specification
On the lower side of this window, select the option Show file’s temporary copy. A new folder with several files will be generated. This whole folder must be sent to technical analysis by Elipse Software’s team.
Alternative
** If the above configuration is not successful, on systems equal to or greater than Windows 10, perform the procedure below. **
This feature is not enabled by default. Enabling the feature requires administrator privileges. To enable and configure the feature, use the following registry values under the HKEY_LOCAL_MACHINE\SOFTWARE\Microsoft\Windows\Windows Error Reporting\LocalDumps key.
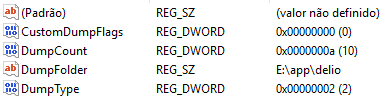
Figure 4: LocalDumps
