1) Introduction
The use of libraries in E3 is highly advisable due to the gain in productivity that they bring.
Some advantages of ElipseX are:
- reuse of code.
- minimization of tests during the development.
- creation of standard interface for the objects developed.
- diminution of the time for developing new projects.
- protection of content of project.
2) Cases in which to create library of objects
The use of a library is recommended in the majority of applications. Nevertheless, there are some criteria for indicating the need for constructing objects:
- Repetition of use, i.e., if the same equipment or process will be used more than once in the same project.
- Procedures that the user knows: frequently, a process that is created by a given company should be protected from copies or alteration. This is common in the case of service integrators or manufacturers of machines.
- Use of controllers: a controller of process, whose mapping of memory is a fixed one, can be implemented with all functionalities available. The flexibility available for the construction and use of objects in E3 allows the further use of just those variables that are of interest, the remaining being despised.
3) Case study
To exemplify the use of libraries in E3, let’s create the control of an engine, which will have as data:
- a tag for temperature of operation.
- an emergency tag, for blocking the operation of the engine.
- a command tag, to switch the engine on and off.
The command and status of the engine should be shown through displays and change of body color. Besides that, the tags to be used for commanding the engine should be external to the library.
Creation of the Project
First, create a standard application through the Wizard. When asked about drivers, storage, and alarms, answer no, for this won’t be important for now.
Creation of XObject
Next, create a new project, which shall be a Library of E3 Components. This project should have the name of “Engines”.
Insert in the “Engines” library a new Xobject, and name it as “LibMotorData”. This is important to ilustrate that the XObject is a data object, being not an interface, i.e., it is not possible to create a message box for some event, for example. The way of doing this interface with the user will be seen during the creation of the XControl.
Insert in “LibMotorData” a data server, and modify its name to “Data”. Inside this “Data” folder, insert a tag of Demo type, and modify the following characteristics:
- Name: TemperatureMotor
- Type: 0 – Random
- Maximum: 100
- Period: 1000
- Scan: 1000
This tag will work as return for the temperature of operation of the engine.
Next, double-click XObject, to create the properties that will be used for commanding and returning the engine status. The list of properties and types to be created follows below.
|
PROPERTY |
TYPE |
|
OnOff |
Boolean |
|
Status |
Internal Tag |
|
Temperature |
Integer |
|
Emergency |
Internal Tag |
With that, we will have the properties that will be used to modify the behavior of the engine when we are executing the project.
On the “TemperatureMotor” tag, create an association between property “Value” and item “LibMotorData.Temperature”.
Always that a given value that is internal to a XObject has to be made available to be externally accessed, the procedure is creating an association over the data to be made available with the property that has been created for this data. In order to do so, the association should follow the “NameOfXObject.Property” standard.
Now, we will start the setting of the following restriction to the operation of the engine: property “OnOff” shall be used to command if the engine is turned on or off. Nevertheless, the engine will be turned on only if the “Emergency” property has value “1”. If not, the engine cannot be turned on.
To implement this restriction, click the right mouse over the “OnOff” property, and go to properties. In the script “OnPropertyChanged”, create the script that is shown below.
IF LibMotorData.OnOff = true then
IF LibMotorData.Emergency = 1 then
LibMedidores.Status.Value = 1
End IF
Else
LibMedidores.Status.Value = 0
End IF
Save the object and register the library by clicking the right mouse over the library. In order to show the use of the library without using a XControl, we will work over the project that has already been created, by accessing the properties through buttons and scripts. Next, we will create an object of control for the engine we are developing.
Use of the XObject in a project
To start with, insert in the “Data” folder that has been created in the standard application, a folder having the name of “Motor1”. Inside this folder, create two internal tags with the names of “EmergencyMotor1” and “StatusMotor1”.
Next, insert a “LibMotorData” object to your project. Make the association between property “Emergency” and tag “EmergencyMotor1”, and property “Status” with tag “StatusMotor1”.
On the “IntialScreen” that has been created in the project, displays and a command button shall be inserted, according to the standard that is shown in the figure below.
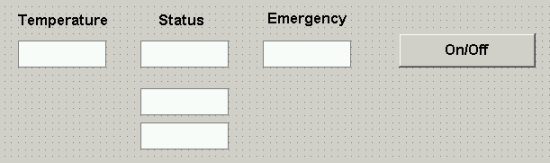
Figure 1 – Control screen of Motor1
For “Temperature” and “Status” displays should be used, and for “Emergency”, a setpoint should be used.
The display used for property “Status” should have the association with the expression “LibMotorData1.Status.Value” (this expression will be in red when shown in the connections tab). The “OnOff” command button should have a script of “Invert Value” type, which should point out to property “OnOff”, and its values should be “False” or “True”.
The two downer displays are auxiliary, indicating if the script is working. In order to do so, the first display shall point out to the expression “Data.LibMotorData1.OnOff”, and the second, to the expression “Data.Motor1.StatusMotor1.Value”. On the definitive control object, we won’t have these displays.
In order to verify the functionality of object “LibMotorData”, execute the project and vary the “Emergency” variable between 0 and 1, and try to turn the engine on or off.
Creation of XControl
As an interface for the engine that is being developed, it will be used an item of the library tab “Symbol Factory”, which is in the “Motors” folder. The figure to be used is “3DISAMotor1”, which is the first figure of the library. This allows the example here described to be developed even if the E3Studio is in Demo mode.
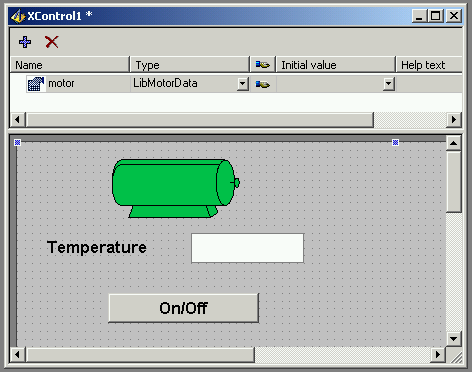
Figure 2 – XControl LibMotor
The LibMotor should be similar to the one shown in figure 2. Associations and actions to be implemented will be next described. Initially, create the skeleton of the object. In order to define property “motor” of this XControl as being of “LibMotorData” type, it is possible to type the complete name of the type, or, by double clicking the right mouse, it is possible to navigate among the types available and select the one we should access. This definition of type is important, for we will have to use all properties defined for object “LibMotorData”, as for example property “Emergency”.
For engine “3DISAMotor1”, property “OverrideFillMode” should be adjusted to “2 – SolidFill”, and filling color should be left ar green “87, 255, 87”.
The display should have the value as associated with expression “LibMotor.motor.Temperature”, where:
- LibMotor: is the XControl name.
- motor: is the property indicating what is the source of data to be shown.
- Temperature: is a characteristic of the “motor” property, which is a data of “LibMotorData” type.
Any association or script to be created in a XControl should follow the standard that has been shown above.
Continuing, the “On/Off” button should have the script written according to the model below.
IF LibMotor.motor.Emergency = 1 then
LibMotor.motor.OnOff = NOT LibMotor.motor.OnOff
IF LibMotor.motor.OnOff = true then
LibMotor.motor.Status.Value = 1
Else LibMotor.motor.Status.Value = 0
LibMotor.motor.OnOff = false
End IF
Else MsgBox “Engine cannot be activated!! Verify if there are defects!!”
End IF
Figure “3DISAMotor1” should have its property “OverrideFillColor” associated through a connection through table to expression “LibMotor.motor.Emergency*2+LibMotor.motor.Status.Value”, which shall have the following ranges of values:
- Minimum and maximum value = 2 , color green.
- Minimum and maximum value = 3 , color red.
- Minimum value = 0, and maximum = 1, color yellow, with blink in blue.
These are the possible results of the expression associated to property “OverrideFillColor”.
Save the library and register it. In order to view the use of the XControl that has been developed, go to the project that has been previously used, and in the “InitialScreen” key, insert a “LibMotor” object. On property “Motor”, associate the XObject “LibMotorData1”. Execute the project, and verify the result. Perceive that the setpoint for variable “Emergency” should be maintained, as the tag is not within the objects that have been developed.
4) Conclusion
The use of internal and demo tags help in understanding the mechanism of objects construction. Nevertheless, it is possible to use any type of tag (for example, a PLC or an OPC tag).
There are two ways of acquiring or controlling tags of equipment with the XObjects: placing the Communication Driver and all tags internally to the object, or externally creating the tags, and associating each one of them to a property of the XObject. What will define the choice of these two possibilities is the quantity of IODrivers available, and the type of use the object will be subject to.
For example, for acquiring data from a controller of temperature, it is possible to use the IODriver internally to the XObject, for all tags are related to the controller. For the circuit breakers of a substation, it is interesting to externally create the tags, and to create links for tags in the XObject, for normally data of a remote (clp for electrical area) are grouped in the same output (Ethernet network or serial port, for example), and should be treated in separate.
The same reasoning is valid for formulas or historics that shall be maintained in databases.
As it can be seen in this example, an XObject can be used as property for another XObject or even for an XControl.
It is important to avoid that a library uses resources of an application to avoid being necessary to alter the lib when using it in another project. For example, if the lib uses an historic, it is possible to pass the database as parameter for the lib, i.e., the historic can be saved in any database as long as it is used as parameter in the lib.
Other examples of libraries are available in the “Demo” project that accompanies the complete installation of Elipse E3.
