GENERAL NOTES
- This article applies to Elipse E3, versions 4.0 or lower.
- There is a bug when using E3DataAccess library in typeless languages, such as VBScript and JavaScript.
- This feature is only compatible with 32-bit applications.
1) Introduction
The E3DataAccess Library enables a new way to connect to the E3 Server. Now, you can connect any application developed on VB, Delphi, .NET or other language that supports COM to the E3 Server by using this Library’s functions.
This article explains how the E3 Server works with a VBA application developed on Microsoft Excel. You can also use the procedures shown in this article for other languages, just adjusting the source codes according to the used language’s syntax.
2) Enabling the E3DataAccess Library’s usage on VBA
Before creating the application via VBA, you must enable the E3DataAccess Library’s usage on the development environment. After that, all necessary functions to communicate to the E3 Server become available.
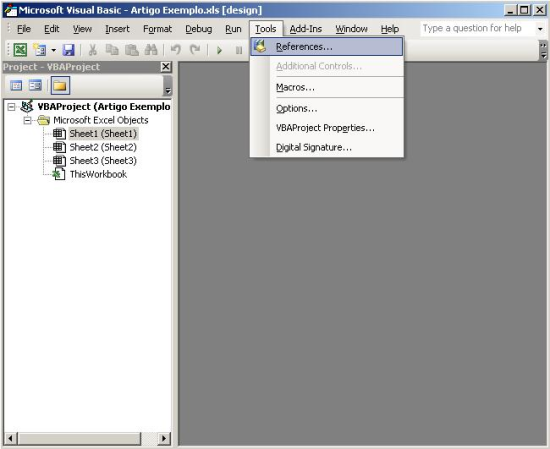
After properly installing E3 Studio, Microsoft Excel and VBA, you must access the Excel application’s VBA interface to add the E3DataAccess Library to the project’s references list. To do so, open the Tools – References menu, according to the next figure:
In the list of available references, select the E3DataAccess Library checkbox.
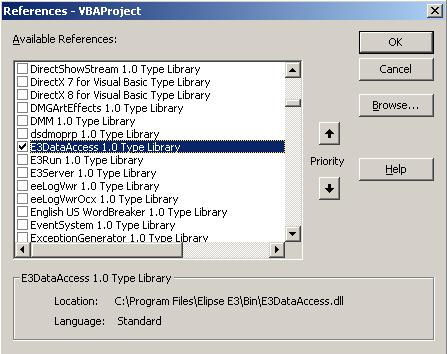
Figure 2: List of available references in the project
If the Library is not available, you must register it first. To do so, click the Browse button to display a dialog box to select the library file (Figure 3).
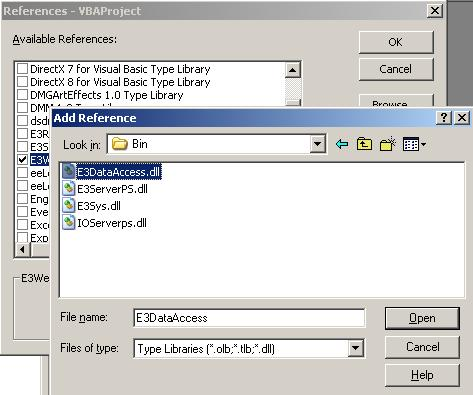
Figure 3: Dialog box to select the library file
Select the E3DataAccess.dll file. You can find it in the E3 installation directory’s Bin subfolder (for example: C:/Program Files/Elipse E3/Bin). After opening the DLL file, the E3DataAccess becomes available and you can enable it. Then, just click the OK button to confirm the change.
3) Instancing a new E3DataAccess object in the project
In this example, a new Module will be added to the project and an E3DataAccess object will be instanced in this module.
To create a new Module, right-click the project in the Project Explorer tab (Figure 4), and select the Insert – Module option.
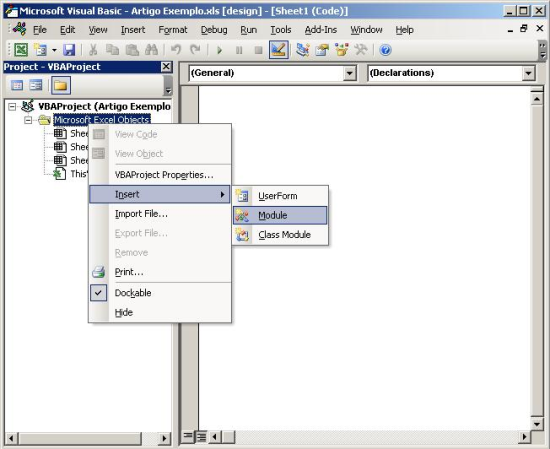
Figure 4: Inserting a new Module via VBA
Then, edit the Module’s name to E3ServerCOM.
Now, you must double-click the E3ServerCOM module to access its source code. Insert the following line to instance the E3DataAccess object:
Public E3 As New E3DATAACCESSLib.E3DataAccessManager
With this line, a new object named E3 is created derived from the E3DATAACCESSLib.E3WebLinkMan class. This class has all necessary functions to connect to the E3 Server. The object is also instanced as public, so it can be used anywhere in the project.
NOTE: *It is important to notice that when instancing an E3DataAcces object, you use one Viewer license. You can check this by accessing the E3 Server’s menu Licenses option. So, you must be careful to not use more licenses than the necessary.
*From version 4.5.208 on, E3Server has featured unlimited support to E3DataAccess and E3AccessLayer connections, thus consuming no Viewer licenses or any other type of licenses.
4) E3 application
To demonstrate the E3DataAccess’s reading and writing methods, you must create two Demo Tags and one Internal Tag in the E3 application’s Data Server. Besides, you must create a Historic with two fields, E3TimeStamp and TagHist (which stores the DemoTag2‘s values):
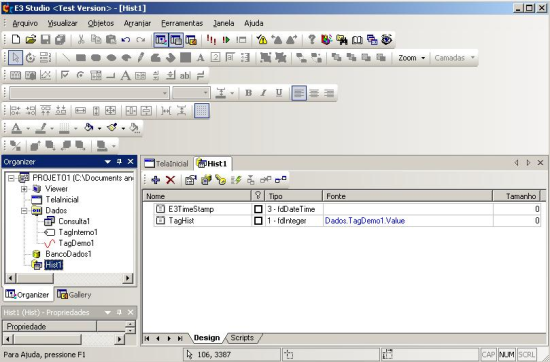
Figure 5: E3 application’s Historic
You must also create an Access Database object named DataBase1 to save all data in the Test.mdb file. Then, link the Database1 object’s DBServer property to the Historic.

Figure 6: E3 application’s Database
After that, name the Historic’s table using its TableName property and generate it by clicking the Create DB Structure button.
Create a Query object in the Data Server and configure it to connect to the DataBase1 and access the created Historic table. In the Query’s settings, create a query to return all data from the Historic table (Figure 7).
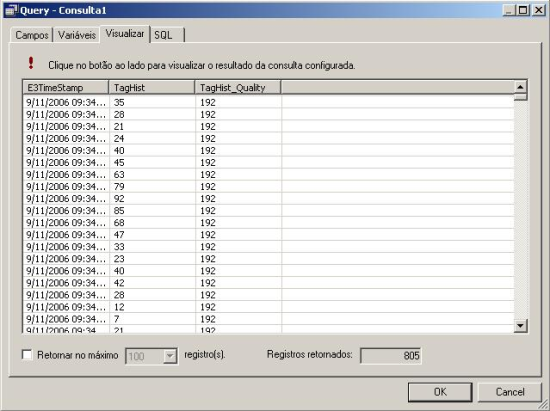
Figura 7: Query’s settings
5) Reading and writing data with E3DataAccess
After setting the E3 application, we get back to Excel. First, select its screen and create two Command Buttons, one to read a value from DemoTag1 and one to write a value to InternalTag1. To add the buttons, enable the Control Toolbox toolbars’ visualization using the View – Toolbars – Control Toolbox menu, as you can see on the next figure:
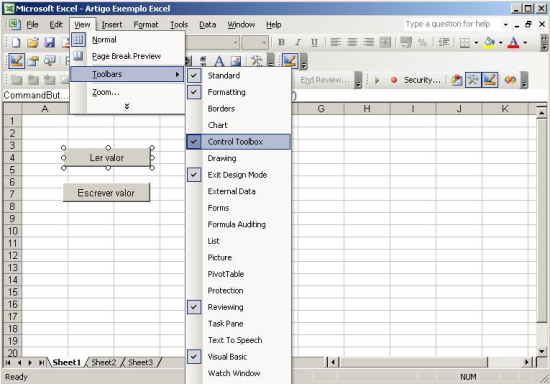
Figure 8: Enabling the Control Toolbox bar in Excel
In the Control Toolbox, select the CommandButton item and add two buttons. Right-click the first button and access its properties to edit its Caption property to Read Value. Also edit the second button’s Caption property to Write and buttons’ Name property to readValueButton and writeValueButton, respectively.
After that, insert the following lines in the readValueButton‘s source code. Double-click the button to open the VBA in the button’s Click() event:
Private Sub readValueButton_Click()
   Dim timestamp As Variant
   Dim quality As Integer
   Dim value As Variant

   E3.Server = "E3Server_HostName"

   If E3.GetValue("Data.DemoTag1.Value", timestamp, quality, value) Then
      Range("D4") = value
      Range("E4") = quality
      Range("F4") = timestamp
   Else
      MsgBox "Connection failure!"
   End If
End Sub
The E3 object in this code is the same public object instanced in the E3ServerCOM module. It sets all operations and connections to the E3 Server, so it is the key of the code. After setting the routine’s variables, a value is attributed to the E3 object’s Server property to set the E3 Server’s name to connect to. This must be configured before performing any operation in the Domain.
Method GetValue(Link, TimeStamp, Quality, Value)
To read the tag’s value, the GetValue() method is used and it receives the following input and output parameters:
- Link – input parameter that supplies the path of the object to be read.
- Timestamp – output parameter that receives the timestamp of the referenced Link.
- Quality – output parameter that receives the quality of the referenced Link.
- Value – output parameter that receives the value of the referenced Link.
When it is called, the GetValue() method returns a Boolean value, TRUE if the operations is successfully performed or FALSE if it does not. In the previous code, we are reading data from DemoTag1 and saving its value, quality and timestamp.
If there is no problem when reading DemoTag1, data is written in D4, E4, and F4 cells of Excel’s spreadsheet. So, when clicking the readValueButton, we have the following answer:

Figure 9: readValueButton‘s answer
The next step is to write a value in InternalTag1. To do so, insert the following lines in the writeValueButton‘s Click() event as you did to the first button (double-click it to open the code area):
Private Sub writeValueButton_Click()
   Dim timestamp As Variant
   Dim quality As Integer
   Dim value As Variant

   value = CDbl(Range("D7"))
   quality = Range("E7")
   timestamp = DateTime.Now

   E3.Server = "E3Server_HostName"

   If E3.SetValue("Data.InternalTag1.Value", timestamp, quality, value) Then
      Range("G7") = "Success!"
   Else
      Range("G7") = "Fail!"
   End If
End Sub
In this code, we use D7, E7, and G7 cells to store value, quality and timestamp, respectively, to write these values in InternalTag1.
After that, the connection is performed in E3 Server via E3 Object’s Server property and the method is called.
Method SetValue(Link, TimeStamp, Quality, Value)
This method is syntactically identical to the GetValue method, it has the following input parameters:
- Link – input parameter that supplies the path of the object to be written.
- Timestamp – input parameter that supplies the timestamp of the referenced Link.
- Qualidade – input parameter that supplies the quality of the referenced Link.
- Valor – input parameter that supplies the value of the referenced Link.
With this method, we write to the InternalTag1 in the E3 application, as you can see on the previous source code.
So, before clicking the writeValueButton, set its value and quality in D7 and E7 cells. The timestamp is configured according to the computer’s clock:
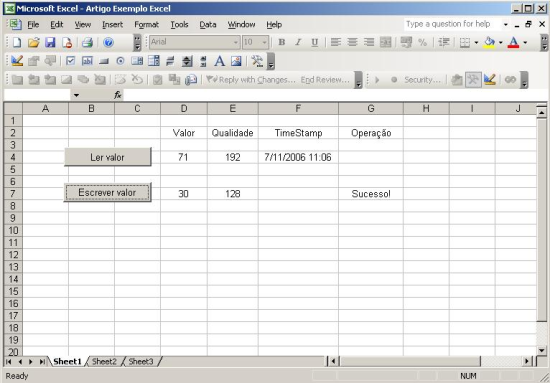
Figure 10: writeValueButton‘s answer
To confirm that the value was written to the InternalTag1, use the WatchWindow tool available on E3 Studio. You can also do this by creating a new button to read the InternalTag1‘s value.
Note: Versions 4.5 or higher also feature two new methods: ReadValue and WriteValue. They replace GetValue and SetValue, which henceforth must be avoided.
6) How to receive values with E3DataAccess
You can also use the E3DataAcccess Library to receive events from the E3 application by using the OnValueChanged event, which receives values in real time, not only at request, like the GetValue method().
So, we will create another button that activates the OnValueChanged event to the DemoTag1, so its value is sent to a spreadsheet cell when it changes.
Name the button as onEventButton and set its Caption property to Activate Event. Then, access VBA to create a new Class Module by clicking the Insert menu and selecting the Class Module option (Figure 11):
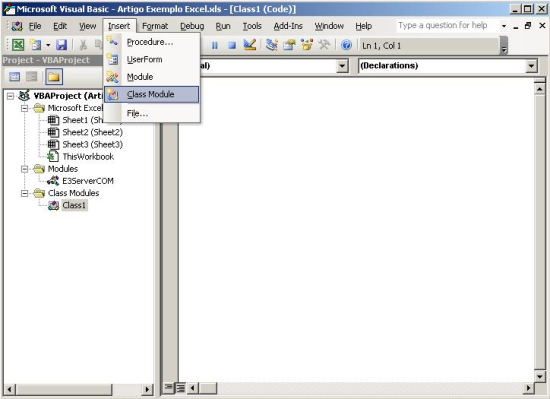
Figure 11: Inserting a new Class Module via VBA
Edit the new Class Module’s name to E3ServerEvents and insert the following line in its source code:
Public WithEvents E3EVT As E3DATAACCESSLib.E3DataAccessManager
With this line, we instance a new E3DataAccess object named E3EVT that can receive events. Then, select the object in the objects’ list box and the OnValueChanged event in the other list box (Figure 12):
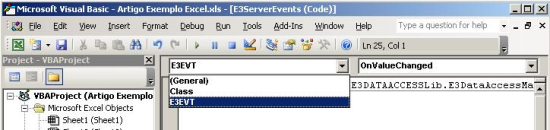
Figure 12: VBA’s objects list box
By selecting the object, the OnValueChanged is automatically set in the class’ source code:
Public WithEvents E3EVT As E3DATAACCESSLib.E3DataAccessManager

'Lines automatically created
Private Sub E3EVT_OnValueChanged(ByVal Path As String, ByVal Timestamp As Variant, ByVal Quality As Integer, ByVal Value As Variant)

End Sub
This event will be generated when data value from the E3 application changes. So, now we will insert the script to be executed when there is a change; configure the spreadsheet cells D10, E10, and F10 to receive the DemoTag1 value, quality, and timestamp, respectively:
Public WithEvents E3EVT As E3DATAACCESSLib.E3DataAccessManager

'Created lines
Private Sub E3EVT_OnValueChanged(ByVal Path As String, ByVal Timestamp As Variant, ByVal Quality As Integer, ByVal Value As Variant)
Range("D10") = Value
Range("E10") = Quality
Range("F10") = Timestamp

End Sub
The Path variable receives the object’s path that activated the event, which is important when there is more than object being monitored.
After that, instance a new object of the E3ServerEvents class in the E3ServerCom Module named as E3Evt1:
Public E3Evt1 As New E3ServerEvents 'Created Line
Public E3 As New E3DATAACCESSLib.E3DataAccessManager
Now, insert the following source code on the onEventsButton‘s Click() event:
Private Sub onEventButton_Click()
   Set E3Evt1.E3EVT = E3

   E3.Server = "E3Server_HostName"

   If Not (E3.RegisterCallback("Data.DemoTag1.Value")) Then
      MsgBox "It was not possible to register the configured Link!"
   End If

End Sub
In this script, the E3vt1’s E3EVT property is linked to the instanced E3 object, in order to work with both the E3EVT object and the E3 object. Then, the E3 Server is connected via Server property.
Method RegisterCallback(Link)
This method is called to monitor events of a certain E3 object. In this example, we will monitor the DemoTag1 object, which has just a single input parameter:
- Link – input parameter that supplies the path of the object to be monitored.
You can monitor more than one object by calling this method for each one of them.
After setting it, it is possible to receive events from DemoTag1 when clicking the Activate Event button (Figure 13):
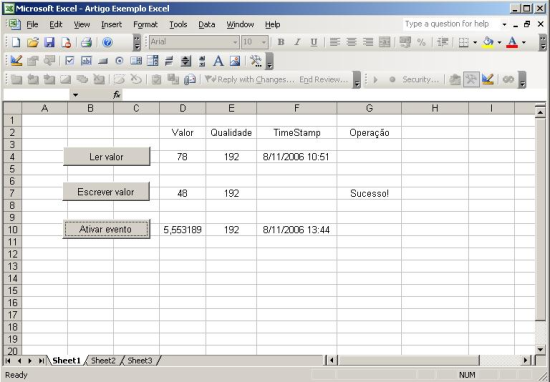
Figure 13: Activate Button’s answer
Now, we will see how to stop monitoring the DemoTag1 by using the UnregisterCallback method.
Method UnregisterCallback(Link)
This method also has just a single parameter:
- Link – input parameter that supplies the path of the object to stop monitoring.
When this method is called, it unregisters the E3 application’s object.
So, create a new button under the Activate Event button. Edit the new button’s name to offEventButton and its Caption property to Deactivate Event.
In the offEventButton‘s Click() event, insert the following script:
Private Sub offEventButton_Click()
   Set E3Evt1.E3EVT = E3

   E3.Server = "E3Server_HostName"

   If Not (E3.UnregisterCallback("Data.DemoTag1.Value")) Then
      MsgBox "It was not possible to unregister the set Link!"
   End If
End Sub
Now, we can activate and deactivate receiving events from DemoTag1 via Activate event and Deactivate event buttons.
7) Performing Queries in the Database object using the E3DataAccess library
The E3DataAccess Library also enables performing Queries in the E3 Database object. To do so, you must create a Database object, configure it, and create a Query object connected to the Database. The E3DataAccess library performs the query using the Query object.
After that, create a new button in the spreadsheet named as queryButton, set its Caption property to Check DB, and insert the following script lines in its Click() event:
Private Sub queryButton_Click()
   Dim Resposta As Variant
   Dim Names As Variant
   Dim Values As Variant
   Dim rnum As Integer

   Answer = Array()

   E3.Server = "E3Server_HostName"

   If E3.GetE3QueryRows("Data.Query1", Names, Values, Answer) Then
      Range("G16") = "Success!"
      rnum = 16
      For i = 0 To 20
         Range("F" + CStr(rnum)) = Answer(0, i)
         Range("D" + CStr(rnum)) = Answer (1, i)
         Range("E" + CStr(rnum)) = Answer (2, i)
         rnum = rnum + 1
      Next
   Else
      Range("G16") = "Fail!"
   End If
End Sub
This script performs a Query in the Database, and from the spreadsheet cells D16, E16, and F16 on, it fills in the first twenty cells with the results returned by the Query. Remember to connect to the E3 Server before executing the script.
NOTE: On the example, the Query returns more than twenty records. However, if your Query returns less than twenty records, just edit the For clause according to what you need.
Method GetE3QueryRows(Link, Names, Values, Rows)
By using this method, we perform Queries to the E3 Database. It receives four variables as parameters:
- Link – input parameter that supplies the path of Query object to be executed in the E3 Server.
- Names – input parameter that supplies an array list with variables’ names to be used in the Query’s execution, if necessary.
- Values – input parameter that supplies an array list with variables’ values returned by the Names parameter to be used in the Query’s execution, if necessary.
- Rows – output parameter that receives a matrix with the results from the executed Query, if it returns any result.
When calling this method, we refer a Data.Query1 Query by the Link parameter, so, the Query is executed according to its SQL property’s content. The Names and Values parameters are set with empty lists because there are no variables being used in this Query. The Answer variable will be used only to receive the return of the Query’s records using the Rows parameter.
The indexes of the returning Answer matrix have the following division: [column][row], the column corresponding to the field and the row to the record returned according to what was requested by the Query. The table consulted in the example has three fields: E3TimeStamp, HisTag and HisTag_Quality. So, the first of the Answer matrix is divided according to the following:
- Answer[0][0] – this is where the value of the E3TimeStamp field from the first returned record is stored.
- Answer [1][0] – this is where the value of the HistTag field from the first returned record is stored.
- Answer [2][0] – this is where the value of the HisTag_Quality field from the first returned record is stored.
- Answer[i][j] – this is where the value of the field i from the row j returned record is stored.
After the source code is ready, when clicking the Check DB button, we have the following result:
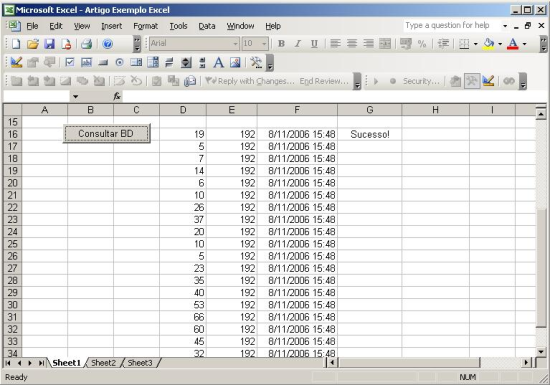
Figure 14: Check BD button’s answer
After this last step, we have shown all available operations with the E3DataAccess Library. With the example application created using VBA, it is possible to read and write values, receive events, and perform queries with E3 application’s objects.
8) Final Remarks
With this article, we can have a better understanding on how the E3DataAccess Library works. Its functions to work with E3 Server are easy to understand and enable us to perform essential operations on E3 applications.
Besides, it increases the development options for E3 applications and supplies the user with the option to develop applications in known environments.
Attachments:
