In this article, we will show you how to use MQTT driver to establish communication between Elipse E3 and devices connected to The Things Network.
The Things Network is an open network whose goal is to enable the Internet of Things (IoT). Specified for low power, wide area, the network is being built by communities around the world that install gateways to which the devices can connect at no cost.
The information in this article about the integration between The Things Network and MQTT can be found at their official documentation.
Network Settings
The Things Network allows low power devices to use wide area gateways to connect to an open, decentralized network, through which they can connect to applications. Similarly, it’s also possible to establish a private network. This article will illustrate how to use an open network, also called community network; however, you can use the same principles shown here to configure the driver to use a private network.
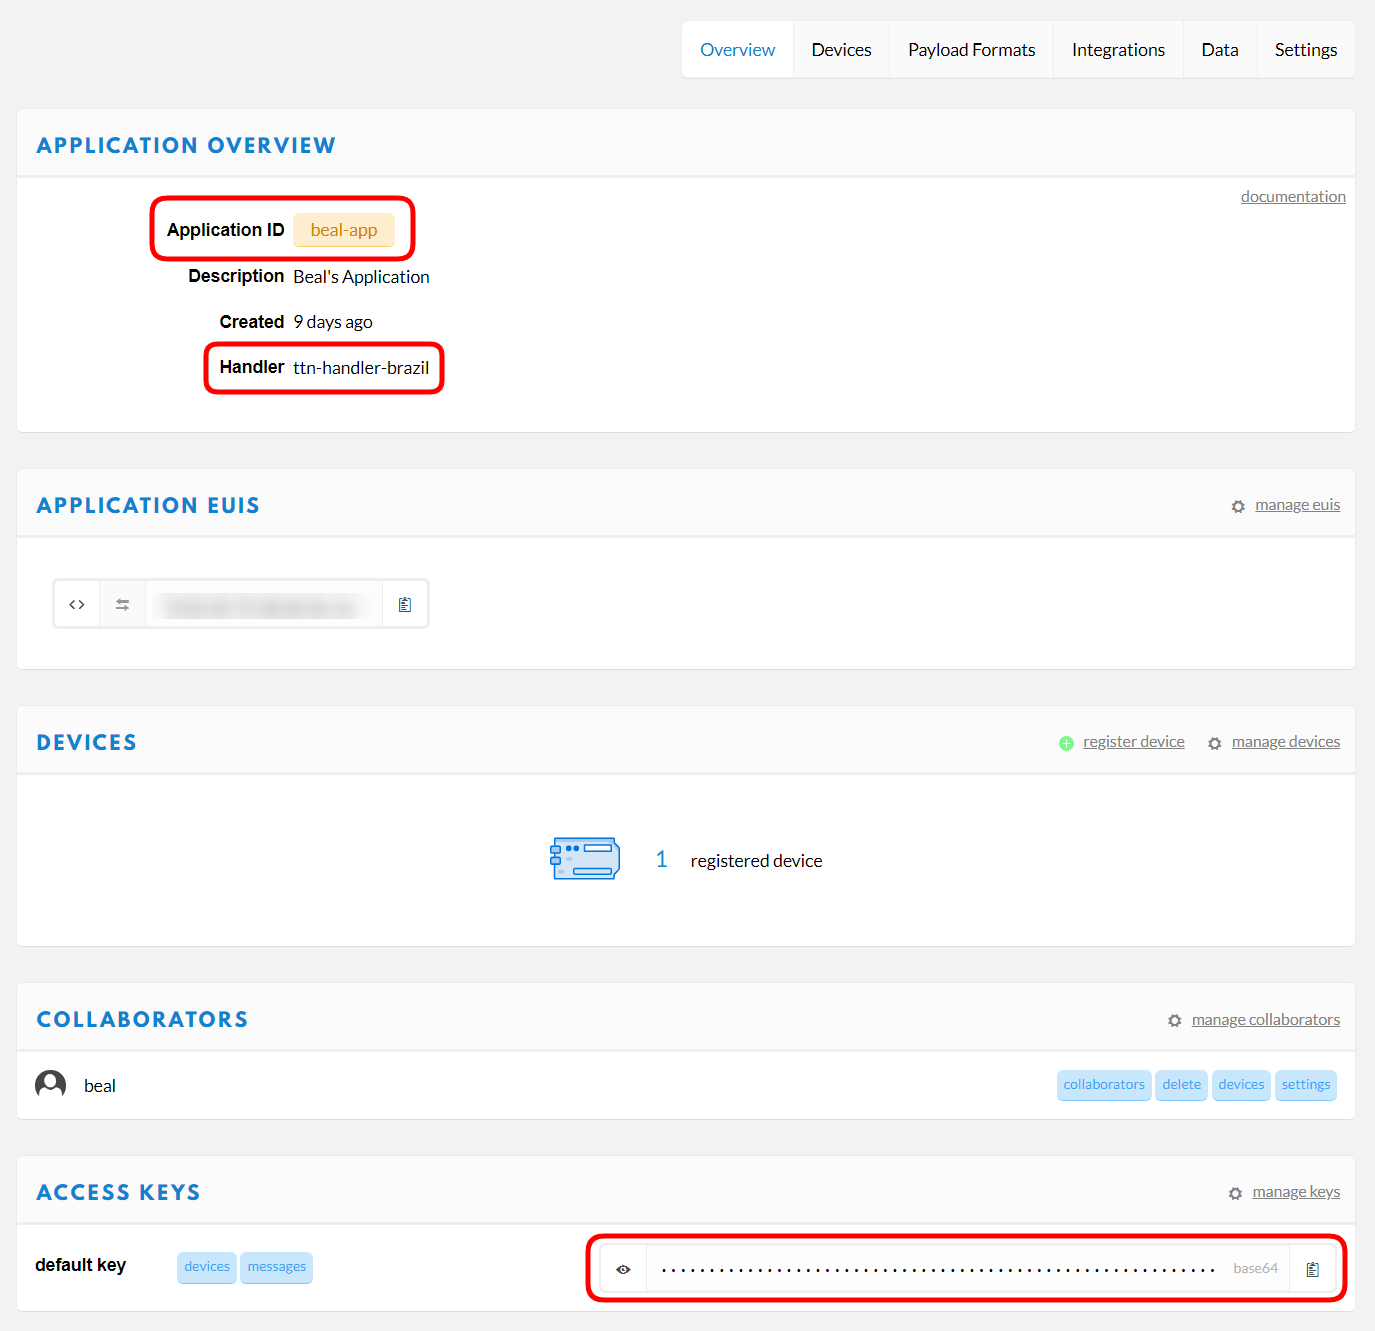
In order to manage your devices and applications in the community network, you will need to use the Console supplied by The Things Network via browser. If required, you’ll need to log in or create an account. After that, click Applications to manage your applications. In this context, an application manages devices and their interactions. Select the application to which you want to communicate, or create a new one. The next page, displayed at Figure 1, shows an overview of the application and indicates some important information for setting up the MQTT driver:
- Application ID – unique name that identifies this application.
- Handler – service responsible for directing messages from multiple applications.
- Access Key – the application’s access key; use this for establishing communication with this application.
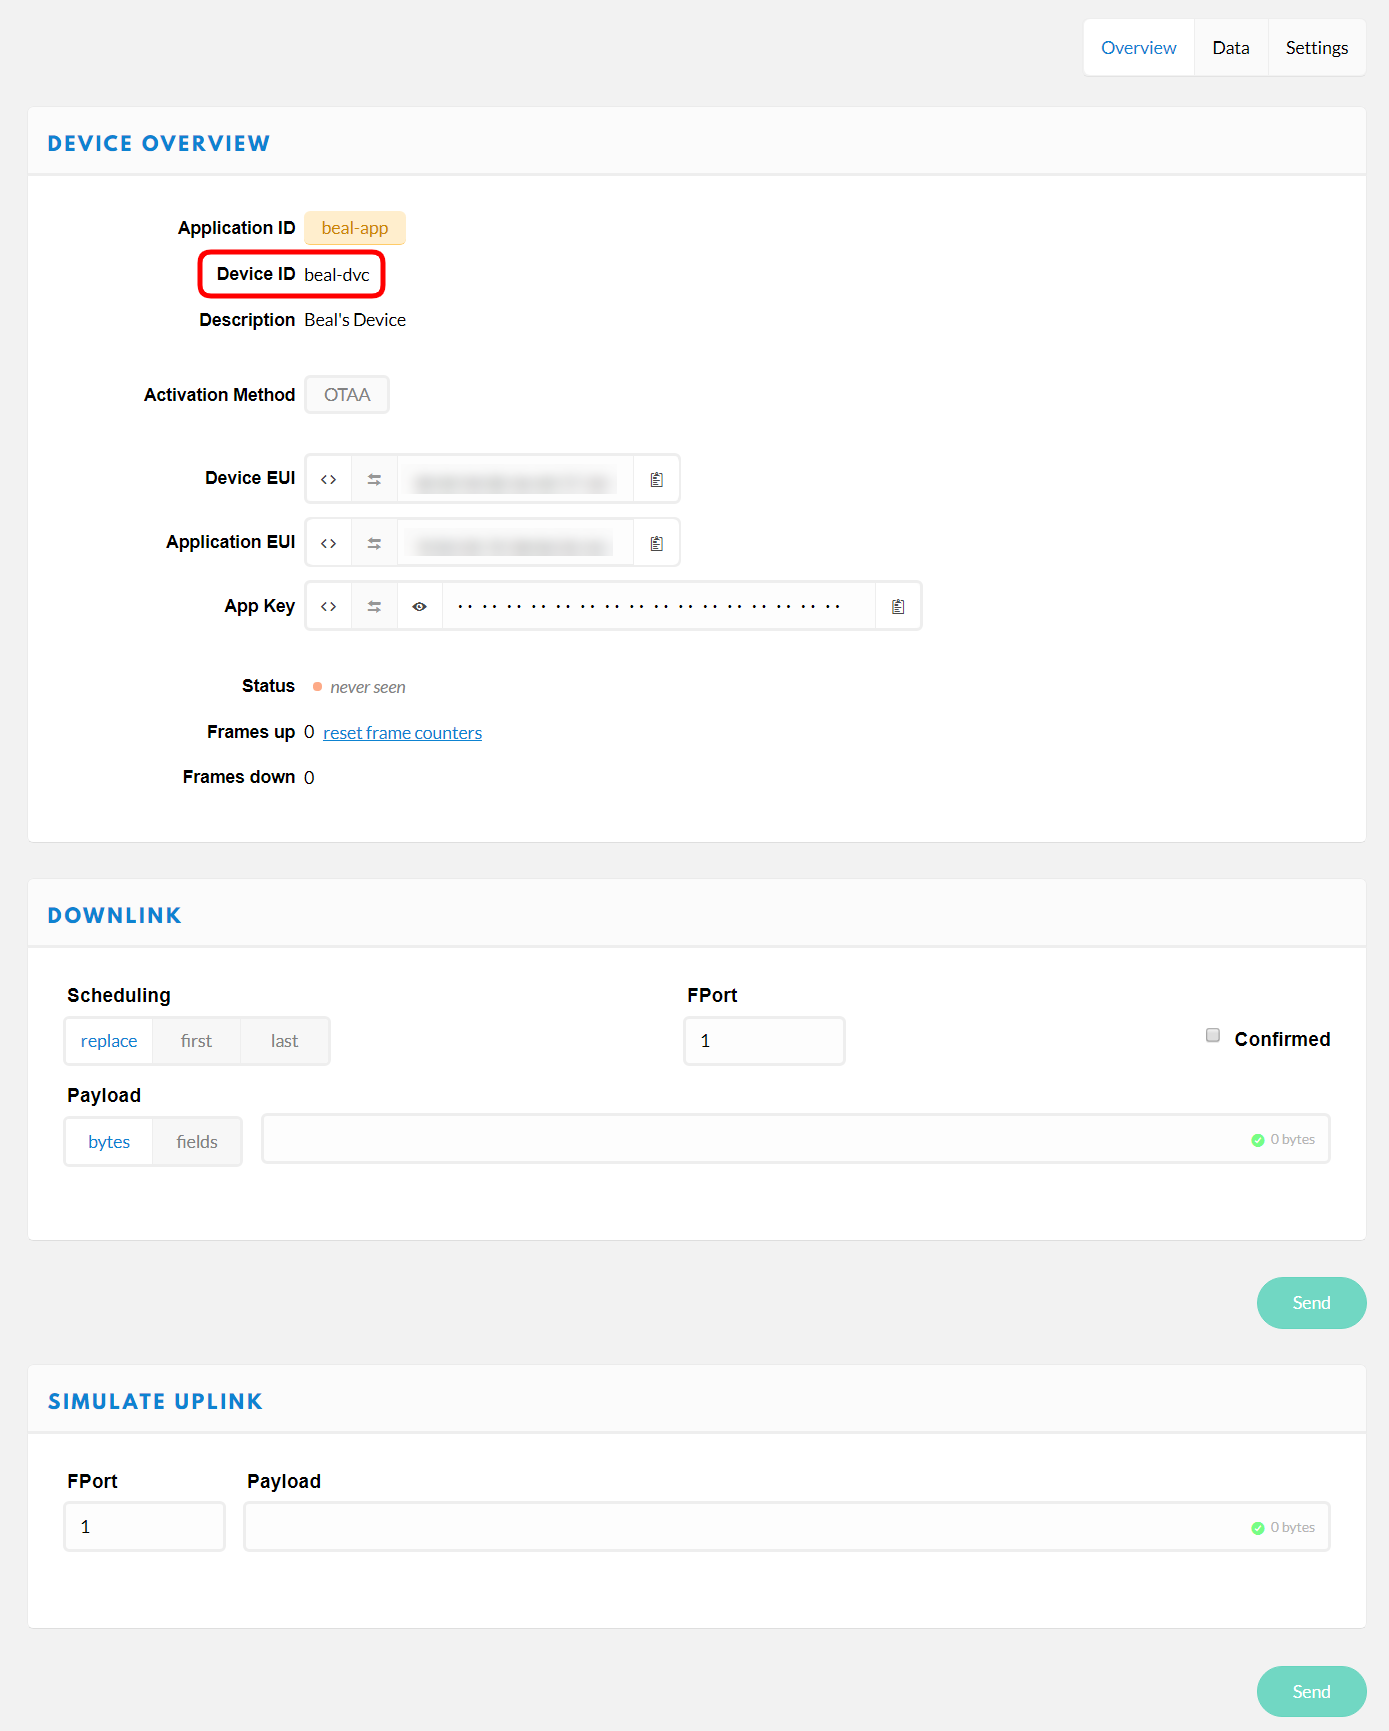
Next, click Devices on the upper menu. Select the device to which you want to communicate with, or create a new one. The next page, as seen below at Figure 2, shows the device’s general information. Additionally, the page allows sending messages to the device (downlink) or simulating messages from the device (uplink). To set up the driver, use the following data:
- Device ID – unique name in the application that identifies the device.
Driver Settings
At Elipse E3, open the MQTT driver’s settings window. Then, access Setup tab and make sure the physical layer selected is Ethernet.
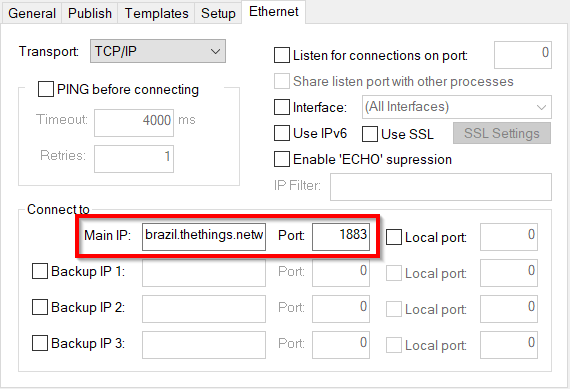
After that, access Ethernet tab, and supply the IP address and the port to which the driver needs to connect. On the TTN community network, the IP address is associated to the handler: [region].thethings.network, where [region] is the handler’s final bit. In the example, the handler is ttn-handler-brazil; therefore, the address isbrazil.thethings.network. When using a private network, the address needs to be supplied by the network’s administrator. By default, the MQTT protocol uses port 1883. Likewise, make sure you set up the transport layer as TCP/IP.
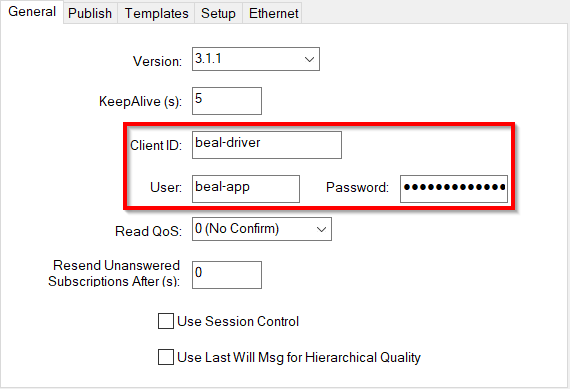
Finally, go to General tab and then set up the access to your application. For Client ID field, inform the name that this driver will use to sign in with the MQTT broker; this name should be unique for all the broker’s connection. At User, add your application’s Application ID and, at Password, add your Access Key. This data was previously retrieved at the network’s configuration, as seen above.
Receiving Data
At The Things Network, the messages sent by devices to the applications are called uplinks. The broker publishes these messages in a topic called: [AppID]/devices/[DevID]/up, where [AppID] is the Application ID and [DevID] is the Device ID. In our example, the topic would be beal-app/devices/beal-dvc/up.
These messages are sent in JSON format. For example:
{
  "app_id":"beal-app",
  "dev_id":"beal-dvc",
  "hardware_serial":"00001111AAAAFFFF",
  "port":1,
  "counter":0,
  "payload_raw":"AQEB",
  "metadata":
  {
    "time":"2020-04-09T16:58:41.105992752Z"
  }
}
Declaring templates
The MQTT driver allows declaring templates in different formats, which help decode the received messages. In order to declare a template, open the settings window and access the Templates tab. Then check the option “Apply local timezone to timestamps” so that the timestamp shows your local timezone. Moreover, add a name to the template, select JSON format, and click Add to create it. Last, click Edit to open the template’s edition window. For further information on how to use templates, check out the driver’s documentation.
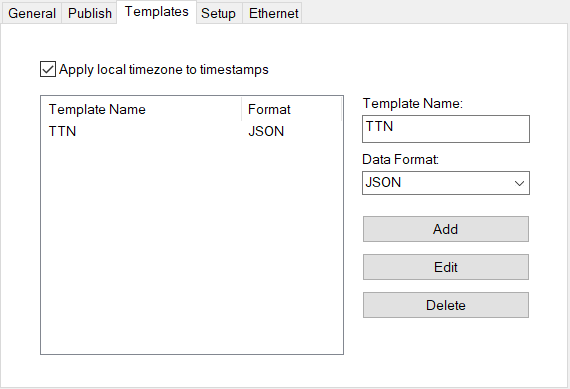
Finally, there is a template for the example application. This template provides the values from three different fields of the received message: “payload_raw”, “counter” and “port”. Additionally, the template reads the message’s timestamp and uses it as the timestamp for the I/O tag.
{
  "payload_raw":"V1",
  "counter":"V2",
  "port":"V3",
  "metadata":
  {
    "time":"TS_TEXT(%Y-%m-%dT%H:%M:%S.%fZ)"
  }
}
At Elipse E3
In order to receive data at Elipse E3, create an I/O tag or block and set it up as read only: check the option Read (AllowRead property as True) and uncheck the option Write (AllowWrite property as False). At Item, add the name of the topic that will be accessed, followed by the name of the template, separated by a “;” (semi-colon). You can express a specific value for the template by adding another “;” (semi-colon) and the identifier of the field used by the template (for example, V1). At Figure 6, you can see different ways of retrieving the values received by I/O tags or blocks at Elipse E3.

Figure 6 displays a message that was sent by simulating an uplink via the device’s general information at Console, as previously seen at Figure 2. Notice that in this case, the payload is informed as hexadecimal, but transmitted and received as base64 enconding. When using an actual device, you can, via Console, create a decoder that translates the bytes sent by the device to a JSON object, thus facilitating data interpretation.
Sending Data
At The Things Network, the messages sent from an application to a device are called downlinks. For that, they must be published at the broker in a topic called: [AppID]/devices/[DevID]/down, where [AppID] is the Application ID and [DevID] is the Device ID. In our example, the topic would be beal-app/devices/beal-dvc/down.
In order to send data from Elipse E3, create an I/O tag and set it up as write only: uncheck the option Read (AllowRead property as False) and check the option Write (AllowWrite property as True). At Item, add the name of the topic you want to access, as seen above.
Make sure you send the messages through the driver in the proper JSON format, otherwise the handler can’t send them to the device. As you can see below, there are two possible formats for that. We suggest you create the package to be sent via scripts.
{
  "port":1,                // Port at the device
  "confirmed":false,       // Should device confirm reception?
  "payload_raw":"AQIDBA==" // 64-based payload: [0x01, 0x02, 0x03, 0x04]
}
{
  "port":1,          // Port at the device
  "confirmed":false, // Should device confirm reception?
  "payload_fields":  // JSON-format payload
  {
    "led": true
  }
}
You can check that messages are being received correctly via Console, by accessing the Data menu from inside the device. Figure 7 shows how it acknowledges receiving the two messages above, sent via Elipse E3.

