Introduction
When configuring a Client Remote Domain in Studio, the E3 Studio of the Client machine access the files of the Server Domain on the path indicated in the Client Domain configuration. This path can be a folder created locally, in the Client Domain machine, or can be a folder share of the Server Domain on the remote machine, accessed via network. In this case, the share must be accessed remotely by the SYSTEM user. When the machines belong to a Microsoft network domain, the SYSTEM user has permissions to access the share without problems. However, when machines are only on the same workgroup, this permission must be explicitly defined.
From version 3.0 on, where the functionality of Remote Domains is available, E3 Server always runs as a service on the SYSTEM account. Services which use the SYSTEM account start on the system context without credentials, that is, without user and password authentication. These services, running without a Microsoft network domain, and which want to access network resources, have their access denied because of a lack of credentials and for using a null session.
This article shows which configurations are needed when both machines are running Windows XP Service Pack 2.
General Configurations
The configurations displayed next must be done on the machine running the Server Domain. This configuration must be done directly on Windows Registry. In this case, follow these procedures:
-
Access the key HKEY_LOCAL_MACHINE\SYSTEM\CurrentControlSet\Services\Lanmanserver\parameters.
-
Create the variable
RestrictNullSessAccess, of type DWORD, and set its value to 0.
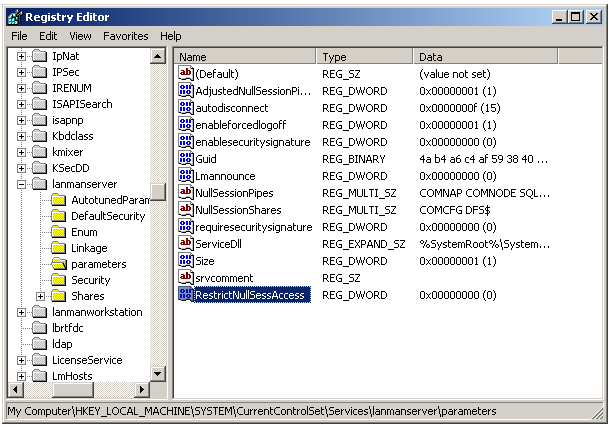
According to Microsoft, the key RestrictNullSessAccess specifies whether the server limits access to the system for users logged on without user and password authentication. Possible values are:
- 0: Access without authentication is allowed and all users can access shared resources.
- 1: Does not allow access without authentication. Users without authentication can only access folders listed in the variable
NullSessionShares.
In any of these cases, there is a need to restart the machine to apply these changes.
Besides, there is a need to configure sharing and NTFS to accept access from ANONYMOUS LOGON and NETWORK user. This can be done in two ways:
-
Accessing the simplified sharing, which generally comes enabled as a default in. To do so, follow these procedures:
-
Select the folder which contains the Server Domain, and which must be shared.
-
Right-click it and select the Properties option.
-
In the Sharing tab, in the Local sharing and security tab, check the Share this folder on the network option, and type a name for the sharing.
-
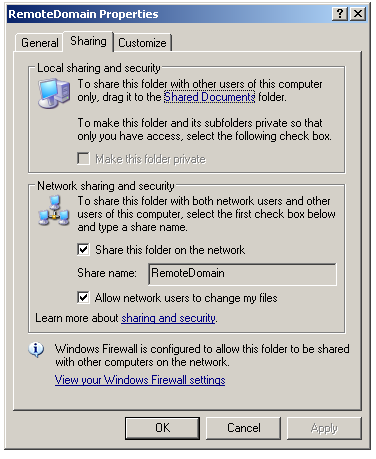
This way the sharing is already configured, giving the necessary permissions for the ANONYMOUS LOGON and NETWORK users.
-
Informing permissions explicitly. For this, you may have to change the view mode of the Properties window, so that the Security and Sharing tabs become visible. To do so, follow these procedures:
-
Access Windows Registry, in the key HKEY_LOCAL_MACHINE\SYSTEM\CurrentControlSet\Control\LSA, and change the value of the
ForceGuestvariable to 0. -
Select the folder which contains the Server Domain, and which must be shared.
-
Right-click it and select the Properties tab.
-
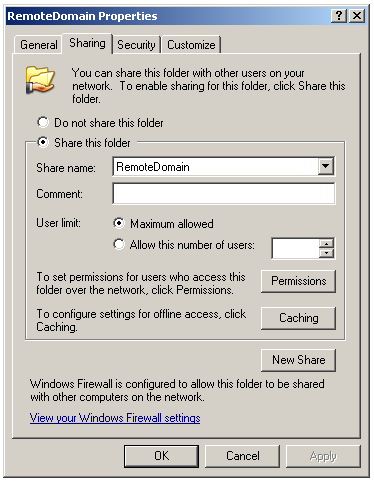
In the Sharing tab, check the Share this folder option and type a name for the sharing.
-
Still in the Sharing tab, click the Permissions button.
-
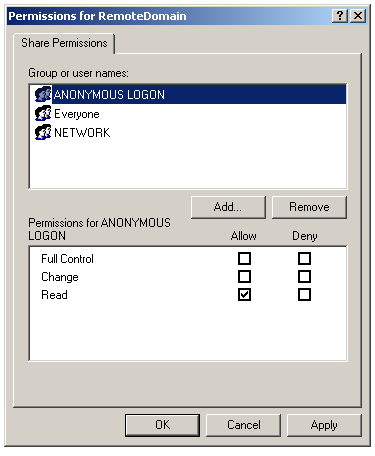
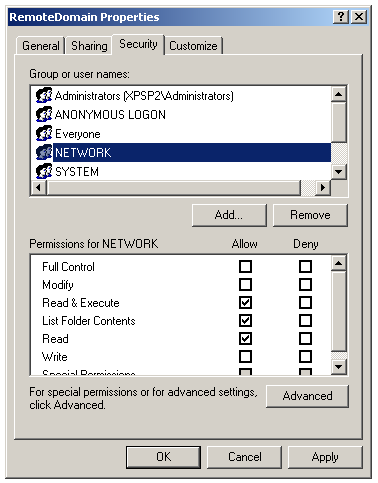
Add the NETWORK and ANONYMOUS LOGON users, allowing reading access to the folder and then clicking the OK button.
-
Access the Security tab and add again the NETWORK and ANONYMOUS LOGON users (the same added in the Sharing tab), then click the OK button.
-
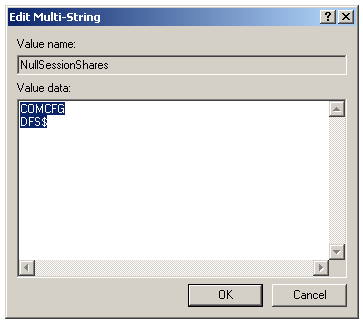
Another way to allow access to the sharing is including the folder which contains the Server Domain to the folder list of the NullSessionShares variable. This variable is in HKEY_LOCAL_MACHINE\SYSTEM\CurrentControlSet\Services\Lanmanserver\parameters. This option works, however it is more limited, once the folder name is recorded directly on Windows Registry, and changing the Remote Domain configuration may also require a change in Windows Registry.

It is also necessary to configure how network logons using local accounts are authenticated. To do so, follow these procedures:
-
Access the Control Panel, choose Administrative Tools and then click Local Security Policy.
-
In the option Network access: sharing and security model for local accounts, choose Guest only – local users authenticate as Guest.
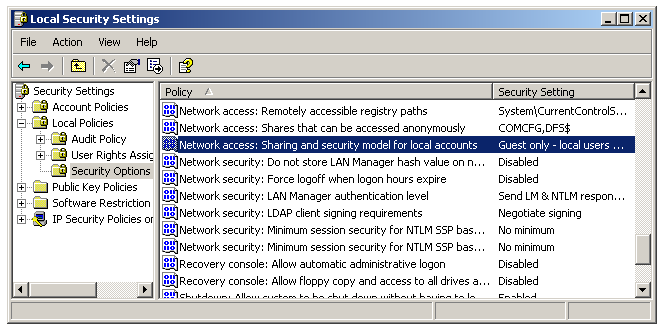
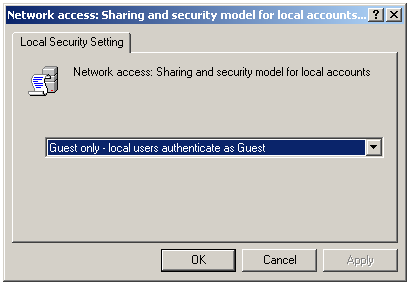
This makes network logons which use local accounts to be automatically mapped to the Guest account, which must be activated.
To activate the Guest account, access the Control Panel, choose Administrative Tools and then click Local Security Policy. Choose the option Accounts: guest account status and activate it.
Other Precautions
In machines running Windows XP, the Firewall is usually enabled. For this communication between machines to work correctly at run time, the Firewall must be correctly configured, or disabled. Information about these configuration can be found on the article Configuring Firewall and DCOM in Windows XP/2003/Vista/2008 for Elipse applications.
Other Information
- http://support.microsoft.com/kb/289655
- http://support.microsoft.com/kb/325874
- http://support.microsoft.com/kb/132679/EN-US/
- http://support.microsoft.com/kb/122702/EN-US/
- http://support.microsoft.com/kb/246261/
- http://www.microsoft.com/technet/prodtechnol/windows2000serv/reskit/regentry/58643.mspx?mfr=true
- http://technet2.microsoft.com/windowsserver/en/library/2b8bdf70-becc-41f7-b305-88300df0892d1033.mspx?mfr=true
Conclusion
Before Windows NT 3.5, it was allowed that a service used the SYSTEM account as well as a normal user account to access resources on a local or remote machine. On newer versions of Windows, this access fails if the SYSTEM account is used. The solution presented in this article grants access again in machines running Windows XP.
