XControl
The XControl creates a graphical user interface composed by any E3 object, which can be easily multiplied in the project. To insert a new XControl in the Library, follow these steps:
- Right-click the XControls, select the option Insert XControl in and click the library file.
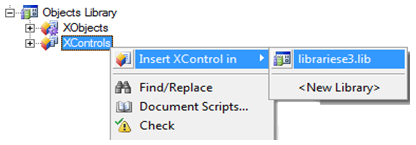
Figure 1
- Change the name from
XControl1to a more suitable name.
When inserting an XControl, see that there are three tabs on the lower part of the screen, Design, Properties, and Scripts:

Figure 2
In the Design tab, it is possible to draw the graphical part of the object and in the Properties tab, you can create properties which can become available to users.

Figure 3
The animations of the graphical part must be related to the properties created through links or scripts. The created properties can be located using the AppBrowser in the XControl itself, and the path of links or scripts is always XControlName.PropertyName.
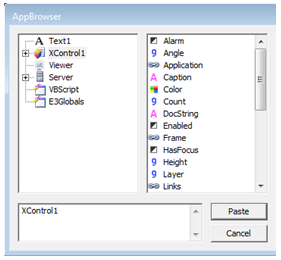
Figure 4
Example
- Create an XControl named
XControl1where you draw an engine and a text, and create the Alarm, Caption, and Color properties. The color and message of the text must be linked to the Color and Caption properties. For this, access the text properties and create the links in the Links tab:

Figure 5
- Next, link the Color property of the engine image (OverrideFillMode) to the Alarm property so that the engine blinks in red and yellow when in alarm:
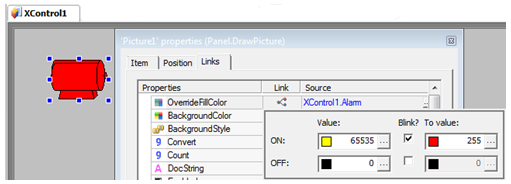
Figure 6
- After creating a Library object, you must save it and register the Library. Then, right-click the Object Library item in the Organizer and select the Register loaded libraries item.
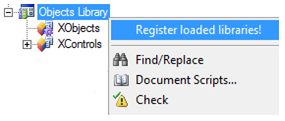
Figure 7
To insert a new object on a Screen, you have two options:
- Right-click the Screen and select the option Insert – XControl.
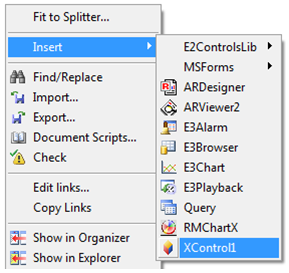
Figure 8
- In the Image Gallery, go to the group Project resources at the end of the list and drag the XControl to the Screen.
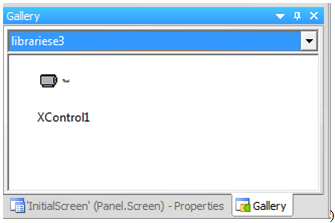
Figure 9
Development of XControls
Now that you already have a project, a Domain, and a library file, let’s set an example of using libraries starting by the development of XControls.
Speedometer
Let’s create an object which simulates a speedometer displaying the speed from 0 to 100. A pointer moves indicating the current speed and it is possible to change the speed by typing a new value on a SetPoint. For this, you must follow these steps:
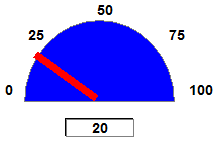
Figure 10
- Insert a new XControl named
Speedometer. - Draw the speedometer using an Arc object and a Text object.
- Insert a Rectangle object as the pointer and a SetPoint object to type the speed value.
- In the Properties tab of the XControl, create a property named Velocity of type Double.

Figure 11
- In the Design tab, create a Bidirectional Link between the SetPoint and the Velocity property.
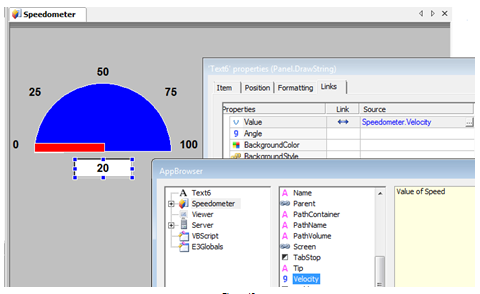
Figure 12
- Select the Rectangle object and insert a Rotation Slider.
![]()
Figure 13
- Configure the fixed point and the shadow of the Animation so that the movement drawing represents the desired path.
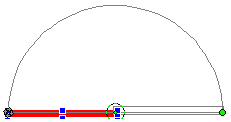
Figure 14
- Create a Simple Connection between the Animation and the Velocity property.
![]()
Figure 15
- Save and register the Library.
Using an XControl
Follow these steps to use an XControl:
- In the
InitialScreen, insert two Speedometer objects. - Execute the application and change the speed value of every Speedometer using its linked SetPoint.

Figure 16
- In the Data object of the Data Server, create a Demo Tag named
Velocity1of type RampUpDown.

Figure 17
- In the
InitialScreen, create a Simple Connection between the Velocity property of theSpeedometer1and the Demo TagVelocity1.
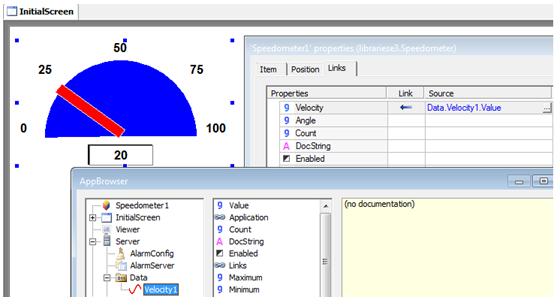
Figure 18
- Execute the application.
Exercises
Bottle
- Create an XControl named
Bottle. - In the Design tab, draw a bottle (go to the group Containers of the Gallery) and insert a rectangle on top of it to symbolize the liquid inside the bottle.

Figure 19
- In the Properties tab, create a property of type Double to get information about the bottle level named
Level, and another one of type Color to get the color of the liquid and name it asColor. - In the Rectangle object, make the links to animate the level (VerticalPercentFill) and the color (ForegroundColor) with its respective properties.
- Save and register the Library.
- Insert three Bottle objects in the Screen, change the properties created (Level and Color) and check if every bottle conforms to the settings.
- Create three Demo Tags (for example,
bottle1,bottle2, andbottle3) of type Random varying from 0 to 100. - Link the level of the Bottles to the Tags already created.
- Execute the application and test its functionalities.
Controller
- Create an XControl named
Controller. - In the Design tab, insert a Controller (group Controllers of the Gallery). On top of it, insert a Display to show the value of the monitored variable, a SetPoint to control the variable and a text to symbolize an alarm in the controller.
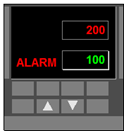
Figure 20
- In the Properties tab, create two properties of type Integer named SetPoint and Variable.
- Link the Display to the Variable property, and the SetPoint to the SetPoint property.
- Create a Link in the Alarm text so that it is only displayed if the Variable value is greater than the value of the SetPoint property.
- Save and register the Library.
- Insert three Controllers on the Screen. Change the properties (Variable and SetPoint) and check if every Controller conforms to the settings.
- Create three Demo Tags (for example,
controller1,controller2, andcontroller3) of type Random varying from 0 to 200. - Link the Variable property of the Controller to each Tag previously created.
- Execute the application and test its functionalities.
Pump
- Create an XControl named
Pump. - In the Design tab, draw an engine.
- In the Properties tab, create a property named On of type Boolean.
- Link the color of the Pump to the On property.
- When clicking the Pump, it must change its on or off state. To do so, create a script on the Click event which switches the On property.
- Save and register the Library.
- Insert two Pumps on the Screen. Change the On property and check if every Pump changes its color.
- Execute the application and test its functionalities.
